Sunday, December 22, 2013

Locked Out Black IPA


With only 2 beers on tap (porter and IPA), we are definitely needing to get brewing to fill that kegerator
 up. Today I brewed our Black IPA (now for the 3rd time). We used the same grain bill as previous versions, but scaled it up for 6 gallons in order to end up with 5 gallons in the keg. Also, now that we have bulk hops, I upped both the late addition and dry hop amounts so hopefully, it will be on par with the commercial example in the hop-department as the malt flavor is spot on (Stone Sublimely Self Righteous).


The day could not gotten off to a worse start though. I went to the garage at about 715a to start the mash and immediately locked myself out of the house. Fantastic start to the day. After that was taken care of, the rest of the day went smoothly. I was able to clean a couple of dirty kegs while I brewed and the weather was nice and cool, although a little windy. I finished in about 3.5 hours, which is one of the fastest days yet.


This batch was also our first brew using the new keggle. Hopefully we wont have similar issues with this brew pot as the aluminum because the stainless steel is so much easier to keep clean. I was happy with it today and it seemed to come to a boil a little quicker than the other pot did. We'll have to keep tweaking our volumes initially though until we get the boil off rate figured out. I'm going to do some reseach about making a dip-tube to draw the wort from the side of the keggle when transferring to hopefully leave a lot of hops and trub behind.


Recipe:

90% Pale 2-row

5% Crystal 60L

5% Carafa III


2 oz Chinook at 60

2.25 oz Centennial at 2 min

2.25 oz Simcoe at 2 min


2.25 oz Centennial -- Dry hop

2.25 oz Simcoe -- Dry hop


Yeast: US05


OG: 1074

Efficiency: 72%

Anticipated alchol: +7%

Friday, December 13, 2013

Happenings and Updates


It has been a couple of weeks since I last posted, thought I would give an update on the brewery


Centennial SMaSH: still carbonating, flavor so far is pretty bitter (like too bitter and I'm worried I may have done something wrong) but hopefully it will mellow some (like the IPA did); it's actually clearing up pretty well from a clarity standpoint too. Hopefully can do a formal tasting post in another week or so.


IPA: Hoping to evaluate this weekend. Stay tuned (spoiler: not groundbreaking, but in the right direction)


CraigsList: Rowdy Reptile is always looking to upgrade and since I recently came into possession of a standard half-barrel keg, it's time to make a keggle (i.e., boil kettle from a keg shell). I found a guy on CL who will cut a hole in the lid and weld a fitting in the side to allow me to drain the wort through a valve. Traditionally, most people will drill a hole and use weld-less fittings which is fine. Having them welded though, ensures no leaks, so I'm very happy to have this option. He's only charging $50 which is an awesome deal, so I'm very excited about that. The keg is being dropped off this weekend and should be ready to go for our next brew (a black IPA) right before Christmas.


I'm also selling the old boil kettle (to bank role the upgrade). The alumimum monster is finally going to find another home and will hopefully bring them better brews. After cleaning the kettle with a vinegar/water mixture, I scrubbed off a lot of grime from the bottom of the kettle. I am thinking this may be the culprit of a lot of the off flavors we've been having lately. Mostly from the standpoint that I have never cleaned the kettle that thoroughly in the past and the grime/scorch has slowly built up over time. Now that it's significant enough, we are probably starting to detect the flavors imparted into our beers.....probably should have cleaned it better, but I had read not to use anything abrasive on aluminum, so I only used a sponge. Oh well, at least now we're finally done with that. I am really hoping these off flavors will dissapear with the new kettle as well as the color issues and we can finally start making excellent pale beers.


Until next time


#TeamDietrich


Saturday, November 23, 2013

Centennial SMaSH Pale Ale


After buying 16 oz of centennial hops, I thought what better way to get acquainted with the nuances of the flavors and aromas than to brew a SMaSH: Single Malt and Single Hop. By only using 1 hop and 1 malt, you can learn a lot of the flavor profiles of each and surprisingly, most people report a good amount of complexity in the finished product.

I chose to use centennial as we both like that hop (it's featured prominently in many commercial beers like Bell's Two Hearted Ale and Great Divide's Hercules DIPA) and we have plenty to experiment with. For the malt I chose to go with Marris Otter (MO). MO is an English pale malt that is kilned to a slightly darker color than standard American 2-row. The darker color gives it a little more biscuity/toasty flavor than US 2-row and therefore will bring a little more to the table. I was shooting for a ~5.5% beer of the pale-ale persuasion seeing that I brewed a 7.2% beer previously. 

It was a relatively smooth brew day, but this was the first time I've brewed at night. Normally, I get up at the crack of dawn and get  75-80% of the brewing done before anyone in the house wakes up. This time, I waited until just about bed time to mash in, and when the kids were down, was able to start the boil. I did a 60 min mash and a 60 min boil with a 10 min hop stand. 

I'm hoping this one will be a lot better than the last pale ale I made, which is on the verge of being dumped because it's just not tasting right and no one wants to drink it.  I am also starting to think that some of my issues making pale beers are not only from the carmelization from my aluminum kettle, but maybe because I am not using high temperature-rated tubing when I am draining my mash (with +160 degree wort). So maybe, some off flavors are being generated there that are otherwise covered up in darker beers. 

I am going to try and sell my old empty bottles (gotta love Craig's List) and put that money towards the conversion of a 15.5 gal stainless steel keg into a brew kettle. Hopefully, that switch and using different tubing will solve the off flavors I'm getting in these beers. Otherwise, I'm going to have to turn to using different water (like Distilled water) and building back my salts/ions from there with the addition of some acid to make sure my pH is in range. We'll see. 


Recipe (6 gallons):
12 lbs Marris Otter

Mash at 151 for 60 min

Hops:
1 oz Centennial at 60 min
0.66 oz Centennial at 20 min
1.5 oz Centennial at 0 min
2 oz Centennial (Dry Hop) 
Yeast: WY1272

OG: 1062
FG: 1012
Alcohol: 6.6%

Brewed: 11/17
Cold Crashed: 11/27
Kegged: 11/31

#TeamDietrich


Firestone Walker Union Jack Clone

In our first attempt at brewing a "real" IPA and not skimping on any hops, we decided to do a clone of an excellent IPA we both love. Firestone Walker is known for making suberb beers, and Union Jack is no exception. I found this recipe on a homebrewer's blog (BertusBrewing.com) and decided to give it a shot. Union Jack won gold at the GABG in 2008 and 2009, so I figured if we're anywhere in the ball park, this will be an excellent beer.

Recipe  (6 gallons):
12.5 lbs Pale 2-row
2 lbs Munich
10 oz Carapils
3.5 oz Carastan

Mash at 147 for 60 min

Hops:
1 oz Apollo at 75 min
0.5 oz each Cascade/Centennial/Chinook at 30 min
2 oz each Cascade/Centennial at 0 min

Dry Hop #1: 1.5oz each Cascade/Centennial + 0.5 oz Simcoe (3.5 oz total)
Dry Hop #2: 1 oz each Cascade/Centennial + 0.5 oz each Simcoe/Chinook (3 oz total)

Yeast: WY1272

Brewed: 10/22/13
Dry Hop #1: 10/31
Dry Hop #2: 11/5
Kegged: 11/9

OG: 1064
FG: 1009
Alcohol: 7.2%

                           Photo: 13 oz of hops!                                                Photo: 4 oz of hops at 0 min 


The brewday was a relatively smooth with only a couple of hiccups. I was supposed to boil for 90 min, but forgot that when I was doing the water calculations and only planned for a 60 min boil. I split the difference and did a 75 min boil and ended up with a little less beer, but the IBUs were still about the same. My efficiency was a little lower than expected (70% instead of the normal 75%) so I came in about 6 points under on the gravity. I also did a 10 min whirlpool/hop stand and let the 0 min hops sit for 10 min prior to the start of chilling. A lot of the pro breweries like Stone and Firestone Walker use these rests before chilling to get the most out of their flameout hops, so I am going to start doing this regularly as well. 

This brew also employs a 2 part dry hop which I've never done before. Since there are so many hops, I needed to be extra careful to avoid oxidizing the beer and ruining the hop flavors I worked so hard to get in there. I did the first dry hop in the primary and the transferred to a secondary vessel for the second addition. I did not want to do both additions in the same vessel to avoid the volume of hops in one container. Making this one a 6 gallon batch was also very help as I lost a lot of volume due to hop and yeast sludge in the primary fermenter. The extra volume also allowed me to fill up the secondary vessel all the way to the top to have as little surface area as possible exposed to oxygen. 

This is the first batch I've also used gelatin (or any finning agents for that matter) to clear the beer. I added the gelatin about 36 hours prior to kegging to precipitate as much out of the beer as possible. I am hoping that the beer will be a lot clearer earlier with the help of the gelatin as opposed to clearing up after a few weeks in the keg. 

I'll do a tasting post of this one in a couple of weeks when it's had time to carbonate and stabilize in the keg. Hopefully it will be worth the $55 I spent on ingredients! 


#TeamDietrich 

Sunday, November 10, 2013

Bulk Hops


I finally, finally, got around to buying a food saver mason jar attachment. With the attachment, I am now able to vacuum seal mason jars and store bulk hops.

After we made the Union Jack clone and saw how many hops are actually needed to make good beer, I knew I had to buy in bulk. Otherwise, I would spend a fortune in just hops alone. There are several places online to buy bulk hops from, but I chose to get this round from YakimaValleyHops.com. We don't make too many English or German beers, so I stuck with common American varieties. It was a little hard to choose which hops to get, but I decided on 8 varieties to start with. Most were at least 8 oz, with 2 of the varieties being 4 oz and 2 oz. Most were about $1.25/oz which is about half (if not more) of the cost of buying single ounces of hops at the homebrew stores. Since I want to really start focusing on pale ales and IPAs, I'll be able to use double the hops for roughly the same price as before.

In total, we now have:

16 oz Centennial
8 oz Cascade
8 oz Simcoe
8 oz Citra
8 oz Chinook
8 oz Columbus
4 oz Ahtanum
2 oz Apollo

The first planned brew with the new hops will be a Centennial SMaSH Pale Ale using Marris Otter. SMaSH stands for Single Hop and Single Malt meaning only using 1 hop for the entire beer and only using 1 malt. It's a good way to learn the flavors and aromas from not only the hop, but the malt choice as well. I'm really looking forward to the next few batches and hopefully I'll finally be able to turn out a solid IPA.

#Team Dietrich

Friday, November 8, 2013

Porter Review


When the weather starts getting cooler, I always crave a nice porter. Dark and malty, they pair nicely with a wide array of dishes and as well as great after dinner beers to enjoy slowly. Last year's batch was well received, so rather than reinvent the wheel, I decided to brew it again.

Recipe
7.5 lbs Marris Otter
1.63 lbs Brown Malt
0.5 lbs Black Malt

1 oz Willamette at 60 min
0.5 oz Fuggles at 30 min

Yeast: WY1968 London ESB

OG: 1053
FG: 1019
Alcohol= 4.3%

Brewed 9/9/13
Kegged 10/9/19

As I mentioned in the post about the brew day, I was concerned with this particular yeast's penchant for  stalling out early. I tried rousing the yeast by swirling the carboy and I raised the fermentation temperature towards the end, but the yeast still under attenuated. With the different yeast last year, the beer started at about the same OG (1052) but finished way lower at 1005.  As a result, this is the lowest  alcohol beer we've ever made. I'm not mad about making a 4.3% beer as I've been gravitating towards more drinkable, lower alcohol beers lately, but I would rather plan on making a 4% beer than making one on accident.

Appearance: pours very dark, a thin cream-colored head that seems to be improving the more the keg ages

Aroma: dark malt, some chocolate and a little bit of roast

Taste: sweet, but not under attenuated sweet (which is good considering it finished at 1019); similar to the aroma with a slight touch of chocolate but a lithe more roastiness. Certainly not a dry finish, but again, not as thick as the final gravity would suggest

Overall: this one is decent; not as good as last year's version, but still a easy to drink, sessionable beer. It's hard to give it a good comparison to last year's version considering the final gravities are so different, but as a result, I wont be using this yeast again in the near future. I know a lot of people have good success with that strain, but I haven't had it myself yet. I will definitely make an English Porter again and use WY1318, but I am also wanting to do an American Porter after having a few good examples last month (Sierra Nevada and Cigar City).


Wednesday, October 23, 2013

Pale Ale Review


Recipe:
9 lbs Pale 2-row
10.6 oz Crystal 40L
10.6 oz Munich
1.6 oz Crystal 60L

0.5 oz Chinook at 60 min
1 oz Cascade at 20 min
1.5 oz Chinook + 1 oz Cascade at 2 min

Dry Hop: 1 oz Chinook

Yeast: WY1272 American Ale II
OG: 1054
FG: 1011
Alochol= 5.6%

This was an attempt to make a little more malty pale ale the Panda Watch Pale Ale. I thought by substituting Munich malt for Carapils, it would lend more malt flavor to the beer without changing the body very much. The result wasn't very good. Compared to the last pale ale (Panda Watch), this one just seems a lot more "blah." It doesnt have the crispness of the previous version, it's not as "bright," and overall it's a little underwhelming.

Appearance: As you can see in the picture, it's still really hazy and kind of a dull copper color. I am starting to think that my aluminum kettle is too thin and is resulting in some caramelization/color change during the boil. It has a reasonable head on the pour that dissipates into a thin layer.

Aroma: The aroma is probably a little more malty this time around. The Chinook hops are providing more of a dark, resinous aroma (as opposed to floral/citrus from other hops) that I like, but there isn't enough of it.

Taste: Again, a little underwhelming, but some malt sweetness upfront and a touch of bitterness. The finish is pretty smooth, which makes it easy to drink.

Overall: not something I would brew again. I think a lot of my problems with hoppy beers are that I don't add enough hops. Seems simple to add a lot of hops to hoppy beers, but before I had a job we couldn't spend $40-50 on a beer. Hops are expensive when you only buy 1 oz at a time, so we used less than we probably should. There's a total of 5 oz in the beer, and it probably should be closer to 8, with all of the additional hops at the end of the boil/dry hop. The malt bill isn't great either. If I were to use Munich again, it should probably be closer to 2 lbs (not around a half a pound).

Overall, it's back to the drawing board for our pale ale. The Panda Watch was good, but I think it could be better. I'm going to start buying hops in bulk this year and I think that will really make a difference. At $1/oz it will satisfy my need to make inexpensive beers, but I can use twice the hops and still spend less overall than previously. I found a great blog (Bertusbrewing.com) by a homebrewer who brews mainly IPAs. I'm going to try a couple of his recipes (and use the same amount of hops) and see where we stand after that. I'm also going to use some of the recipes in the IPA book Elise got me and hopefully, in the next few months we'll have some proper IPAs and Pale Ales on tap.

#TeamDietrich

Monday, October 21, 2013

Kegerator Part 5: Let There Be Beer

After everything was dry, it was time to finally attach the gas and beer lines. The kegs had been sitting in the kegerator the entire time, so they were cold (and aside from the pale ale which had a leak) were all carbonated. Therefore, as soon as I could hook them up, we would be able to drink from them.

The gas (22 feet) and beverage line (40 ft) that I bought each came as 1 continuous length of tubing. I had taken some measurements from where I thought our 5-port manifold would be mounted and came up with about 1.5’ of tubing for 3 of the gas lines and 2’ for the other 2 gas lines; the extra length would be used to attach the manifold to the CO2 tank. Each beer line would be 8’ in length, with 4 taps, I only technically needed 32 feet of tubing. I wanted an extra beer line in case we ever brought a keg somewhere and needed to set up a picnic tap, I would have enough line to serve it properly. Each tubing was cut and then attached to the correct connector (gas vs beverage) and fitted with a hose clamp to ensure a good seal. I mistakenly bought 1/4” gas-line attachments for the manifold instead of 5/16” attachments. You would think that the 1/16” difference wouldn’t matter that much, but surprisingly it did. Thankfully, with the hose clamps tightly secured, there weren’t any gas leaks coming from the manifold.

Instead of trying to drill into the side of the freezer (and risk damaging something vital behind the wall) I decided to glue 6 magnets to the back of the manifold and mount it to the sides of the chest freezer. I glued a few days in advance and the glue was cured nicely in time to start assembling. Here it is on the outside of the chest freezer to make it a little easier to visualize.


After setting up the gas lines, it was finally time to connect our beer lines. The tubes were simply run up to the tower and attached to the back of the faucets with hose clamps. There is plenty of room in the tower, so the connections with the faucets don’t need to be angled at 90 degrees which made them easy to attach. We wrote with a silver sharpie on the actual connections down below to make it easy to identify which tap line was which for ease when swapping kegs out.


Next was time to mount the faucets. We bought standard chrome-plated faucets (brass underneath) as they are much less expensive than full-on stainless steel faucets (about $25/ea vs $50/ea). They get the job done, but aren’t as nice and tend to drip more than stainless steel Perlick faucets. Over time though, we’ll slowly convert each one to a SS faucet, and maybe even a stout faucet for when we serve stout as the faucets are easy to change out.


After all the lines were set up, we needed to flush the tubing with sanitizer prior to serving any beer through them. I filled a keg with StarSan (a no-rinse sanitizer) and then attached it to the CO2 tank. Each tap was then opened to allow sanitizer to run though the lines and faucet for about 30 seconds. After all the lines were clean, we hooked up the beer and were ready to drink, finally.


Saturday, October 5, 2013

Kegerator Part 4: Tiling

Picking out tile wasn’t an easy task. There are so many options and a very wide range in prices. We didn’t have a ton of money to spend on the project, so it was a process trying to find a quality tile that we liked and wouldn’t break the bank. We eventually settled on a glass and stone mosaic combination we found at Lowes. For $5.98/sq foot, it was a pretty good price as our 2nd choice was about double that.


We needed to get 11 tiles to fill the top and had to do some cutting to fill in the top row and the last rows on the edge. Since the tile is manufactured to “interlock”  there isn’t a flat edge on the sides and we had to get a tile saw in order to square off both ends. We first looked at renting one, but estimated that it would be about $75-100 depending on how long we wanted to use the saw (4hrs vs 24 hrs). So we turned to Craig’s List again and found a saw for $55. Other supplies that we ended up having to buy included 2 trowels (to spread the mortar), grout float, grout sponge, drill-bit mixing attachment, and spacers.

The day we decided to lay the tile I was working an evening shift (230-11p) so I cut the tile in the morning. Using the tile saw was pretty easy and the blade was still in good condition. It cut through both the glass and stone easily as long as you went slow and there was plenty of water in the blade-well. We had laid the tile out the night before and numbered each tile to match where it would lay on the lid. The planning beforehand really made the cutting easy and I was done in about 15 minutes.


When I got home from work (around 1130p) and with both kids asleep, we mixed our mortar and set off. I was responsible for spreading the mortar and Elise laid the tile behind me. Neither one of us had any previous experience with tiling before, but we each had a read a couple of articles and watched some videos on YouTube, so we had a little bit of an idea of what we were supposed to be doing. It turned out to be a pretty smooth process, except for around the tower. A round tower with rectangular tile made for a little bit of difficulty, but with the extra tile pieces we had left I cut some angles and we made it work as best we could.


We had to let the mortar sit for 24 hours before we could grout, but since there was both stone and glass on our mosaic, it was recommended to us to seal the stone prior to grouting to avoid the grout soaking into the stone. On Day 2 it took about 5 min to brush sealant on the stone tiles and another 24 hours of waiting until we were ready to grout.

On Day 3 we mixed the grout and Elise worked it into the tiles. The tape around the tower was taped only on the top so the grout would be flush against the sides of the tower to hide the plywood beneath.  After the grout sat for a bit, it was time to use the sponge and wipe off the excess. Luckily the sponge had a textured side which made the scrubbing easier than expected to remove the stubborn grout from the tiles, but overall it wasn’t too painful of a process for Elise to do.


After the mortar dried for 24 hours, we had to apply another coat of sealant, this time to protect our newly finished grout. I didn’t have much of a clue as to what I was doing, so I just soaked the sponge with sealant and spread it around the tile. I applied 2 coats to make sure I got enough on there and then waited for about 30 minutes prior to wiping the excess off. After that, it was another 24 hours to completely dry and then we could set up the beer lines and finally start drinking.


Tuesday, October 1, 2013

Kegerator Part 3: The Tower

Before we could lay any tile (or mount the tower) we had to lay some plywood on top of the unit as the mortar wouldn’t stick as well to metal as it would glue. We found some relatively inexpensive wood at Lowe’s and had it cut to size. In retrospect, I wish we would have chosen a little thicker wood as the one we bought was bowed a bit even after we laid it flat for about 36 hours. I doubt anyone else would notice, but Elise and I can still see a little bit of the bow even after the tile had been laid. 

We then bought some heavy duty glue and glued the wood to the top. Overnight, we laid the tile, boxes, buckets of sanitizer, and pretty much anything heavy we could find on top of the plywood to make sure we got a good seal from the glue before we did anything else.


After 24 hours, it was time to mount the tower. The tower came with 4 screws, but I knew they wouldn’t be long enough to reach clear through the lid, so we bought some 2.5” screws with matching nuts and washers. Our original plan was to have the screws be long enough to mount the washers/nuts on the inside of the lid in the freezer, but once we got down there, it was harder to get everything to line up than we thought. It took some trial and error (and widening of a couple of holes) to get the screws going  where we thought we wanted them to go, but overall we had a hard time getting everything to be flush at the bottom of the screws. We also realized that the inside was plastic and pretty flexible making it less than ideal to mount to. Instead, we just decided to screw the washers/nuts all the way up to just underneath the surface of the lid. This was the thickest and sturdiest point, so it turned out to be much better anchor point than our original plan; not to mention much easier as once the screw was threw the lid, it didn’t really matter if it wasn’t perfectly straight.

We bought a 2.5” hole saw (drill bit) to make a hole through the plywood and lid to run the beer lines through. The tower itself is 3” in diameter with the base at 4.5” wide. We wanted to make the hole for the lines a little smaller than the tower itself just to allow some more contact between the tower and the lid as we weren’t sure how steady it was going to be. It turned out that the 2.5” hole was the perfect fit and a piece of 2” wide by 2” high PVC piping made a nice port for the lines to go through and keep the insulation in the lid where it belonged.


It took about 30-45 minutes to get all of the holes drilled and the tower mounted but once it was up, it was looking good. It felt sturdy enough, but we were hesitant at first to completely open the lid and let the tower “hang,” but the screws and nuts held true. Next we needed to tape off the base prior to tiling and take some measurements to determine where our cuts would be needed to fit the tiling around the tower.


Wednesday, September 25, 2013

Kegerator Part 2: Planning

Once we knew we were going to get a chest freezer, the hardest part was deciding on how we wanted the kegerator to look. We both knew we didn’t want to have the taps coming out the side of the chest freezer as the look wasn’t right for us, so that left getting some sort of tower on top. Towers aren’t cheap, but we found a very good deal on a stainless steel “T” tower with 4 taps. We toyed around with the idea of trying to build something, but rationality won, and we nixed that idea. We decided to go with 4 taps after doing some fitting with our current kegs. We wanted to store the 20-lb CO2 inside the kegerator to hide it, so that left enough room for comfortably fit 5 kegs. With 5 kegs inside, we decided to not do 5 taps, that way with 4 on tap, the extra spot could be a carbonating keg to be “on deck” as soon as it was needed.

As for the top and sides of the unit, we must have spent a week scouring the internet for pictures of other people’s kegerators to get some inspiration. We eventually found a really nice picture of one with a tiled top and wood around all the sides (on further research, it turns out he had a vanity that he tiled on top and ran the beverage lines in from the basement below). You can see the picture below, but we used this as a general model for our project.


We had some rough sketches of the unit with measurements of various aspects of the freezer. We could then start sizing tiles, borders, paneling, etc.


Next we went to Lowes to pick out tile and try to game plan on what we were going to do with the sides and front. We thought we were pretty lucky when we found some wainscoting that fit perfectly for the front of the unit without any cutting. Our plan was to just glue it on the front and then paint it a nice dark espresso color. For the sides we planned to attach some plain boards and then frame the front corners to complete the look.


Unfortunately, upon further research, we learned that it’s not the best idea to glue wood to the front/sides of a chest freezer. When the compressor turns on, it actually dissipates heat through the front and side walls of the unit. If we were to glue directly to the walls,  it would be harder for the heat to escape and you can stress the compressor out and potentially shorten its life. To avoid that, we’ll have to separate the walls of the chest freezer with our wood paneling by at least 1-inch.

We’re still trying to figure out how we’re going to do that and still make it look good, so for now, we just focused on the top of the freezer. It had been about a week since we drank any draft beer (which is too long in the Dietrich house, especially during football season), so we decided to finish the top and then deal with the sides later. With the tile picked out, we were ready to go.


Sunday, September 22, 2013

Porter


With cooler weather approaching, it's time to start brewing for the Fall. I really enjoyed last year's English porter, so I decided to brew it again this year. Porter is one of my favorite beers as it is a dark, malty brew that is great to sip on and savor slowly. It's a little chewier than stout and usually a little less roasty and pairs great with BBQ and all manner of chocolate deserts.

This time around we used the same exact recipe as well as water additions adding sodium chloride, (NaCl, salt), CaCl (calcium chloride), Sodium Bicarbonate (NaHCO3, baking soda), and Chalk (CaCO3). The carbonates (CO3's) are needed to raise the mash pH as the black patent (a highly kilned malt) will lower the mash pH due to it's acidity. Chlorides are also needed to push the Sulfate:Chloride (SO4:CL) ratio in favor of the chlorides to accentuate the malty flavors of this beer.

Last year I used WY1318, London Ale III and had really good results. Unfortunately, the brew store was out of that strain and I subbed WY1968. Looking back I wish I would have chosen something different, but 1968 is considered a good all-around strain, so hopefully it will perform well. It has received some bad reviews from people who say it does not attenuate very well, so I'll have to keep an eye on the fermentation and raise the temperature towards the end to make sure the yeast doesn't flocculate out too early.

Not the greatest picture above (it's early and dark outside), but you can see the mash is very dark and already has a nice mocha-colored head on it. This is not going to be a strong beer, more of a sessionable beer at ~5% alcohol.

We'll give it a couple of weeks to ferment out, by that time we should have some more space in the kegerator (the Pale and Schwarz are almost gone) so we'll be able to start carbonating it and serve as soon as there is room.

Last thought: it's hard to believe we've only brewed 6 times this year! The last few years we've been averaging over 90 gallons/year and we're only at a third of that so far and it's almost October. Most of that is due to the residency for the first half of 2013. Working 70 hours/week with only 4 days off a month really cut into our brewing time. Thankfully, we've brewed just enough recently to have a full kegerator. Now that work is normal at 40 hours/week, hopefully we'll be able to squeeze in another 4-5 brews in the remaining 3 months of the year.


Thursday, September 19, 2013

Kegerator Upgrade Part 1: Buying a Chest Freezer


For several months (pretty much all summer) we’ve been talking about wanting to move the kegerator inside. The outside kegerator didn’t have the greatest seal on the doors and would have a lot of condensation on the outside when it was humid (which is all the time here in NC). Also, the taps and drip tray would get moldy if not cleaned on a regular basis. Overall, having a kegerator outside just wasn’t ideal in this hot and humid climate.  I have been nonchalantly browsing Craig’s List for a while looking for a good deal on a kegerator, but after discussing it with Elise, we both decided that a new, clean, and energy efficient freezer would be the way to go; especially if it was going to live inside.

We decided that we would list our old kegerator on Craig’s List, and if it sold, would use that money towards a new unit. I posted on a Tuesday, and over the following weekend, we were able to sell it for $330. For a fridge with 3 taps, my 5-lb CO2 tank and regulator, and a 4-way manifold, I think I could have gotten a little more than what I ended up getting, but the most important part was that we had some money to go towards a new unit. I still have the 20-lb CO2 tank, but it was nice having the extra small tank in the garage to use when filling kegs. I’ll keep looking for used tanks online and get one when I find a good deal.

Since we were upgrading in equipment, I also wanted to upgrade in the number of taps.  We had 3 before, so that meant going to 4 or 5. Because we wanted to have that many taps, a fairly large sized chest freezer would be needed, something in the +14 cubic foot range. Elise happened to be looking online at Lowe’s one day and found a 14.8 cubic ft chest freezer that was marked down $150, and since there was only 1 left, we pulled the trigger and bought it!

What will follow is our account of making the chest freezer into our own personal kegerator. In order to make this process easier to read and follow, I’m planning to post in smaller portions instead of one giant, long post.

Reminder: This is not going to be posted to correlate where we are in the project.
It’s already done. It looks awesome. 

Enjoy!

Wednesday, August 28, 2013

Hop Update


The hops are now in their second year of life and I was hopeful we would get a few ounces of hops this year at harvest time. Unfortunately, the plants had other ideas. They both seemed to climb quickly, so I thought things were off to a good start. For the Newport, all 4 bines reached the top, while the Centennial had 1 bine reach the top very quickly and the rest seemed to stall out. I don’t know if they got too much direct afternoon sunlight, or the soil wasn’t good, or not enough water, or something else, but there have been no hops at all. We were both looking forward to at least dropping a cone or two in some beers, but we didn’t even get that. Since there’s nothing to harvest, I’ve all but given up on them and have now stopped watering them for the season. We’ll see what the future has in store for those two, but this year was a lot of wasted time and water. Hops usually don’t produce much in the first year, and tend to start increasing after that. I have heard people say it takes up to 3 years before they really start producing, so we’ll see if they get another shot next year.

#TeamDietrich

Pale Ale


Over the weekend with Elise’s parents in town, I was able to brew another batch of Pale Ale. With football season coming up (and a lot of darker beers on tap), I thought keeping a Pale Ale on tap would be nice. With the last batch turning out so well, I decided to keep most of the recipe the same. We’ll still do pale malt with a mix of C40 and C60, but instead of CaraPils, I subbed Munich Malt. Hopefully the Munich will add a touch more maltiness and body to the beer.

I also changed the hopping up a bit. This time we’ll bitter with Chinook, then 1 oz of Cascade at 20min. At 2 min we’ll add 1 oz of Cascase and 1.5 oz of Chinook (pic above of the 2.5 oz of hops). We’ll dry hop with only 1 oz of Chinook this time. With the last pale ale, we did 2 oz of dry hop and I felt as though 2 ounces should have produced more hop aroma than it did. I don’t know if it is a result of hopping in the keg, or some other reason, but this time I’ll add more hops at the very end of the boil and add less as a dry hop. I hope that the Chinook with add a nice herbal/spiciness to the citrus characters from the Cascade. We’ll see how that turns out. This one should be similar to the last batch and clock in around 5.5-5.6% and be ready in about 3 weeks.

There’s been some developments at Rowdy Reptile in the last week regarding the kegerator, but more on that later.

#TeamDietrich

Friday, August 9, 2013

Tasting: Panda Watch Pale Ale


We brewed this beer in anticipation of Cody's arrival. Our friend Ryan attributed the waiting around to the Panda Watch scene in Anchorman, and we thought that would be a great name for this beer. 

Appearance: deep straw in color, almost amber. Now that's its been legged for a few weeks, it's actually cleared up nicely; maybe a touch of chill haze. There is some lacing from the head thanks to the hops. 

Aroma: early samples were very very citrusy, which had died down some now. Still a good citrus note, but there are some more herbal and grassy aromas in there. 

Taste: a nice amount of bitterness, about what I would want in a pale ale. Not tongue-splitting bitter like an IPA, but nice and slightly more bitter in a bitter:malt ratio. Good hop flavors that last throughout; similar to the aroma. The carbonation is nice and crisp (maybe a touch on the high side if I'm being picky) and makes for a medium-low bodied ale. 

Overall: 
I wish the color was a little bit lighter, but I think most of that is coming from carmelization in the kettle during our boil. Since we have an aluminum pot, it is a little thinner than stainless steel, so the flame is causing some darkening. Most of our lighter beers always seem to have a darker quality to them than they should. Hopefully some day we'll move on up to a stainless steel kettle.

But overall, we are really enjoying this beer. I think to date, this is the best hoppy beer we've made, and I think a lot of that has to do with our brewing salts. We added a lot more sulfates to this one than we ever have before. The high sulfate content is supposed to accentuate hops, and it seems like that is definitely true. It's nice and crisp, and pairs well with just about anything we want. 

#TeamDietrich

Sunday, August 4, 2013

Manifold Upgrade


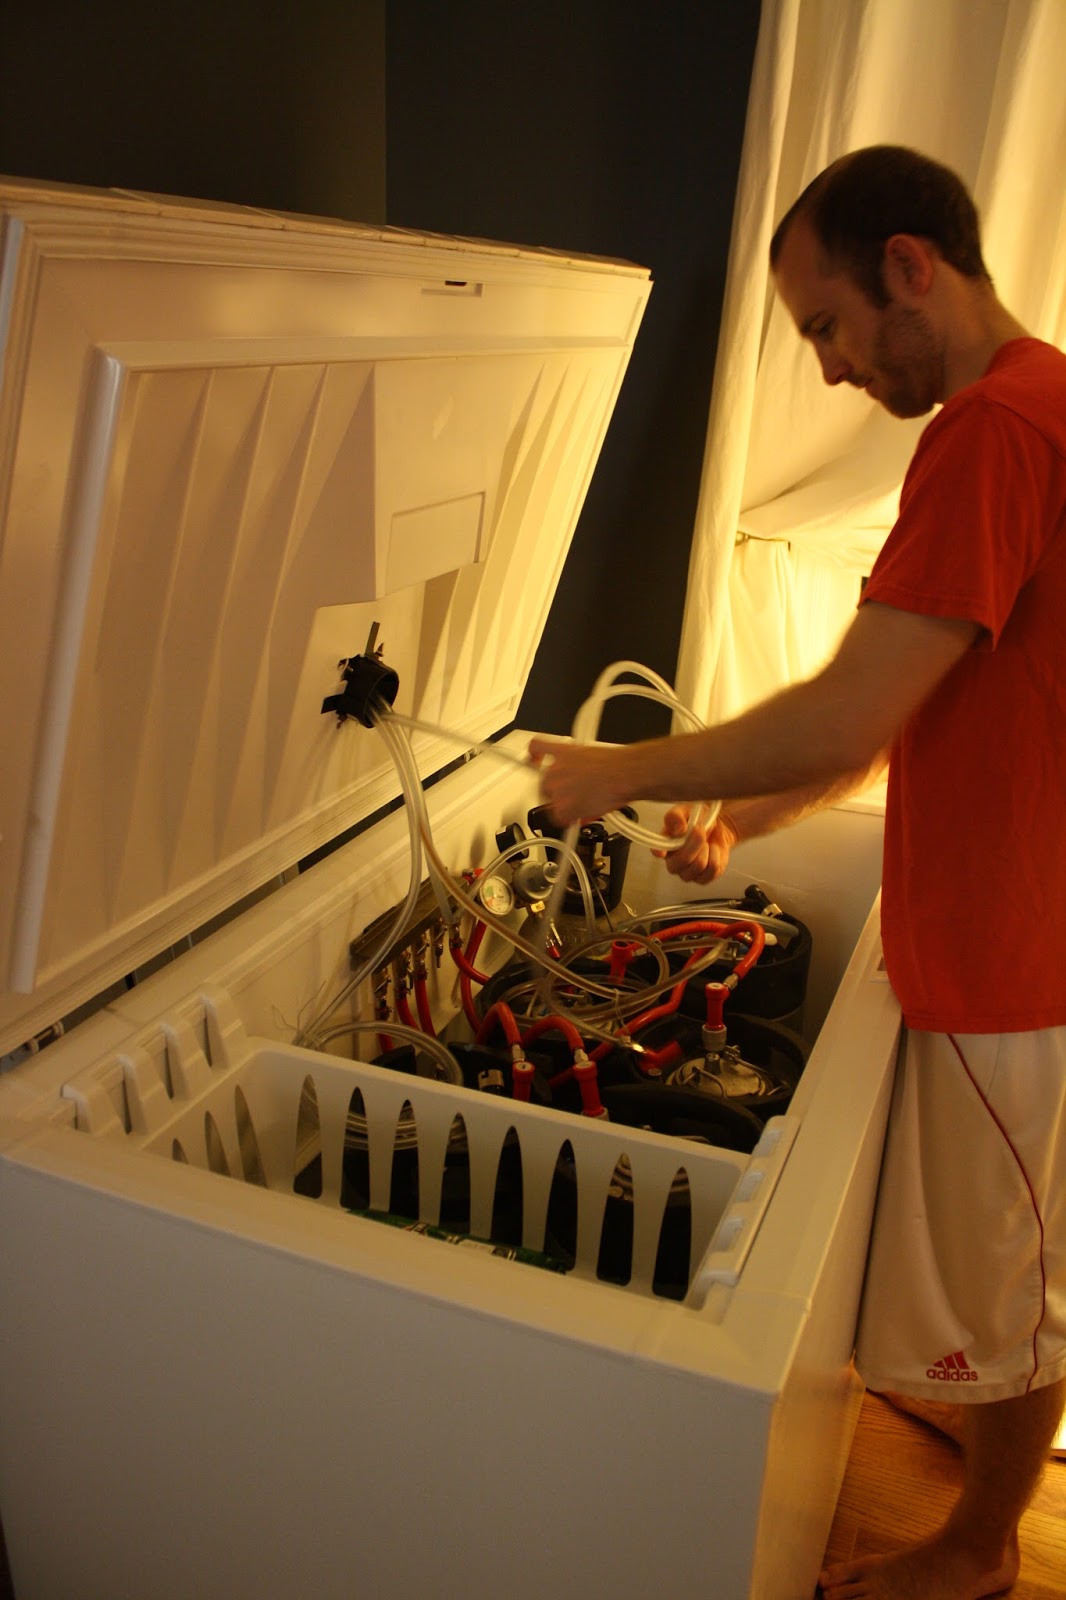
Now that we have a pipeline going with enough beer and kegs, it was time to upgrade our manifold a bit. When we got the kegerator, we planned on 3 taps, so we bought a manifold with 3 valves to carbonate/dispense each tap (the 3 red gas lines in the picture above). Now that we want to have beer “on deck” and carbonating while not on tap, we need to expand our gas line options.

Ideal world: buy in-line regulators. In-line regulators are regulators in series, that that as you go down the line, you can decrease the PSI and have each tap at a unique carbonation. This would be ideal as we brew a wide variety of beers and English, American, and Belgian beers all have subtle differences in recommended carbonation levels. Unfortunately, these are not cheap, so we’ll wait on that for a while.

Manifold options:
1.       Buy a new, larger manifold: We could upgrade to a 5-port manifold to have everything we would need, but again, this would require another $70, and then what do we do with the old one?
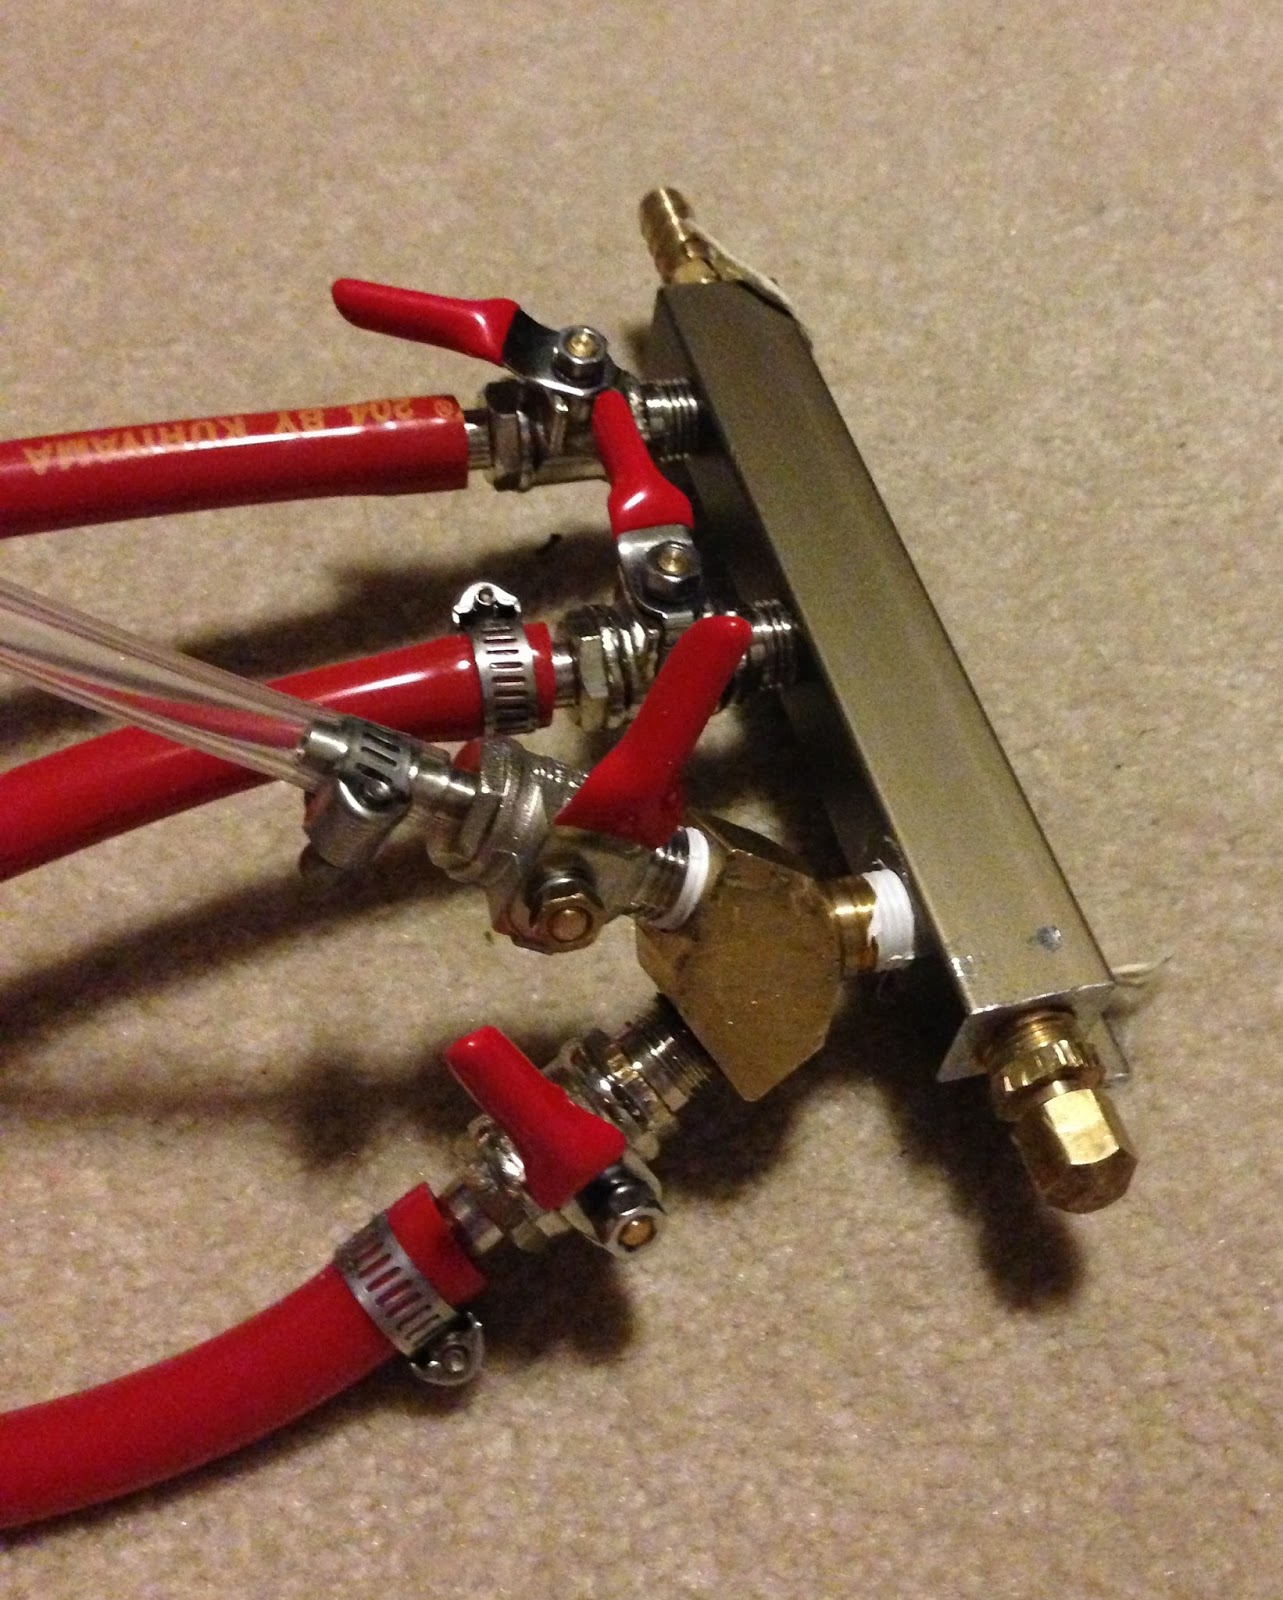
2.       Add a Y-site: This will turn 1 port into 2, and will only cost about $20 with the fitting and the new check valve that we’ll need. They’ll both be at the same pressure, but so is everything else right now, so it wouldn’t be different than what we are doing now.  

If anyone’s read this blog before, you know that here at Rowdy Reptile, we do things on the cheap; so we went with the Y-site. It was a lot harder to assemble than I imagined only because the old valves were next to impossible to unscrew. I tried different things over of the course of a few days without any success. Eventually, I bought a small $4 vise from Lowes and was able to clamp the manifold down to a counter in the garage. Only then was I able to unscrew one of the valves to add the y-site. Once assembled, the only issues is the tight spaces between the valves. As you can see, the y-site is perpendicular to the other valves to allow enough space for the actual tubing. 

Thankfully, it's up and running now, but as you would guess, we aren't using all the lines just yet. Since the Black IPA was ready I swapped that out for the Dubbel. Hoppy beers are best fresh, so I wanted to get that up and running as soon as possible. As I think the Dubbel could use a little more time to age, I took that out of the fridge for now and will let it age until we need it again in the garage.

Next posts will be some more tasting notes, then hopefully we'll squeeze in another brew in a couple-few weeks. 

#TeamDietrich

Tuesday, July 30, 2013

Tasting: Schwarzbier


Appearance: at first glance, it looks black, but when held up to the the light the beer is a deep brown and is actually quite clear. There is an off-white colored head that dissipates into a thin layer but lasts through the rest of the beer 

Aroma: sweet, dark malts; a hint of roast, no hops. The majority is likely coming from the high amount of dark Munich malt is this one

Taste:  very smooth from start to finish. The sweetness from the dark malts is very enjoyable and is well balanced by just a hint of roast. Its not "sugar" sweet, but instead, more of a deep dark-bready flavor. For such a dark beer, the roast is very minimal and if I weren't looking for it, I probably wouldn't notice it. The carbonation is right on and there are enough bubbles to cleanse the palate between bites of food 

Overall: the smoothness if this brew combined with the moderately-low alcohol makes this a great session beer. I think the 3 months of lagering have helped the smoothness, and I wouldn't change anything about this beer. It has been pairing well with everything from cookies to BBQ and is turning out to be a lot more versatile than I originally thought it would be. Elise and I are both really enjoying it (even in the summer) and I should probably make another pretty soon for the late-fall/winter. Maybe next time we'll use a proper lager yeast and compare the difference with the Cali-"lager" (aka steam beer) yeast.

Next post I'll review the Panda Watch Pale Ale

Until then, 

#TeamDietrich

Saturday, July 20, 2013

Black IPA on Deck

Just finished kegging the Black IPA and added the 3 ounces of dry hop: 2 oz Simcoe, 1 oz Centennial.  The re-used yeast did a good job and this one clocks in at 6.9% alcohol. The uncarbonated sample tasted pretty good. Very smooth, a good level of roastiness, but not as bitter as I imagined. We'll see how bitter it is when it is carbonated and cold, but I am looking forward to tasting this one in a couple of weeks.

The make sure we get the most out of the dry hop (and because we finally have a full kegerator) I am not going to start fully carbonating this batch yet. This time I will give the dry hops about 4 days at room temp to infuse into the beer. Hopefully this will allow for more character into the beer early on as compared to the Panda Watch Pale Ale in which the dry hops were added right before it was put into the fridge at 38. The colder it is, the longer the hop oils will take to diffuse throughout the beer. By giving a few days at room temp, hopefully we'll jump start that process and have more aroma when we start drinking it.

No future brews planned yet, but it will have to be something light in color as we have 3 beers of the darker persuasion on right now (Schwarz, Black IPA, and Dubbel). Maybe another pale ale, or we'll try our hand at a Witbier. We'll see.

Friday, July 5, 2013

Black IPA and Free-range Eggs

Today we were able to squeeze in a brew before Elise's parents head back to Tampa. We've got mostly malty on tap with the black lager and the Dubbel, so we decided to make an IPA. We haven't made our black IPA in a while, so we thought we would stay with the "dark" persuasion and make it a black IPA. 

This is a clone of Stone's Sublimely Self Righteous which is made with Chinook, Simcoe, and Amarillo hops. We are able to get Chinook and Simcoe, but Amarillo hops are unavailable so we subbed Centennial. I ordered more hops online than I thought, so we used an extra ounce of Centennial at the end of the boil and will add an another ounce of Simcoe to the dry hop. 

I have been having some issues with efficiency and final volume since moving to NC. Our efficiency has been a little lower and I have been ending up with a little less than 5 gallons in the fermenter. I decided to try to start with a little higher boil volume an just accept that the efficiency will be a little lower for now. During the boil I was worried I would have too much volume so I turned up the burner towards the end. I did boil more off, but over did it a bit, and finished with a tad under 5 gallons. 

We will reuse the yeast from the pale ale and expect to drink this one in about 3 weeks. It's a higher gravity beer and will be a little over 7%, so hopefully Elise will be a little more tolerant of higher alcohol beers by then (after a 9 month drinking hiatus). 

Every time we brew, I never know what to do with the spent grain. I hate being wasteful and throwing stuff away, but I never have a good use for the grain. We could make dog treats, but that only uses a cup (out of 10-12 pounds). I had read somewhere that the grain is good chicken feed, and so I decided to put an add on Craigslist seeing if any chicken farmers in the area could use the grain. I had someone respond in less than 10 minutes and made plans to hand the grains off. In return, the chicken farmer left us a half-dozen free-range eggs! I have never had a fresh egg before, so tomorrow will be an interesting breakfast when Elise makes me a biscuit egg sandwich.