Thursday, September 19, 2013

Kegerator Upgrade Part 1: Buying a Chest Freezer


For several months (pretty much all summer) we’ve been talking about wanting to move the kegerator inside. The outside kegerator didn’t have the greatest seal on the doors and would have a lot of condensation on the outside when it was humid (which is all the time here in NC). Also, the taps and drip tray would get moldy if not cleaned on a regular basis. Overall, having a kegerator outside just wasn’t ideal in this hot and humid climate.  I have been nonchalantly browsing Craig’s List for a while looking for a good deal on a kegerator, but after discussing it with Elise, we both decided that a new, clean, and energy efficient freezer would be the way to go; especially if it was going to live inside.

We decided that we would list our old kegerator on Craig’s List, and if it sold, would use that money towards a new unit. I posted on a Tuesday, and over the following weekend, we were able to sell it for $330. For a fridge with 3 taps, my 5-lb CO2 tank and regulator, and a 4-way manifold, I think I could have gotten a little more than what I ended up getting, but the most important part was that we had some money to go towards a new unit. I still have the 20-lb CO2 tank, but it was nice having the extra small tank in the garage to use when filling kegs. I’ll keep looking for used tanks online and get one when I find a good deal.

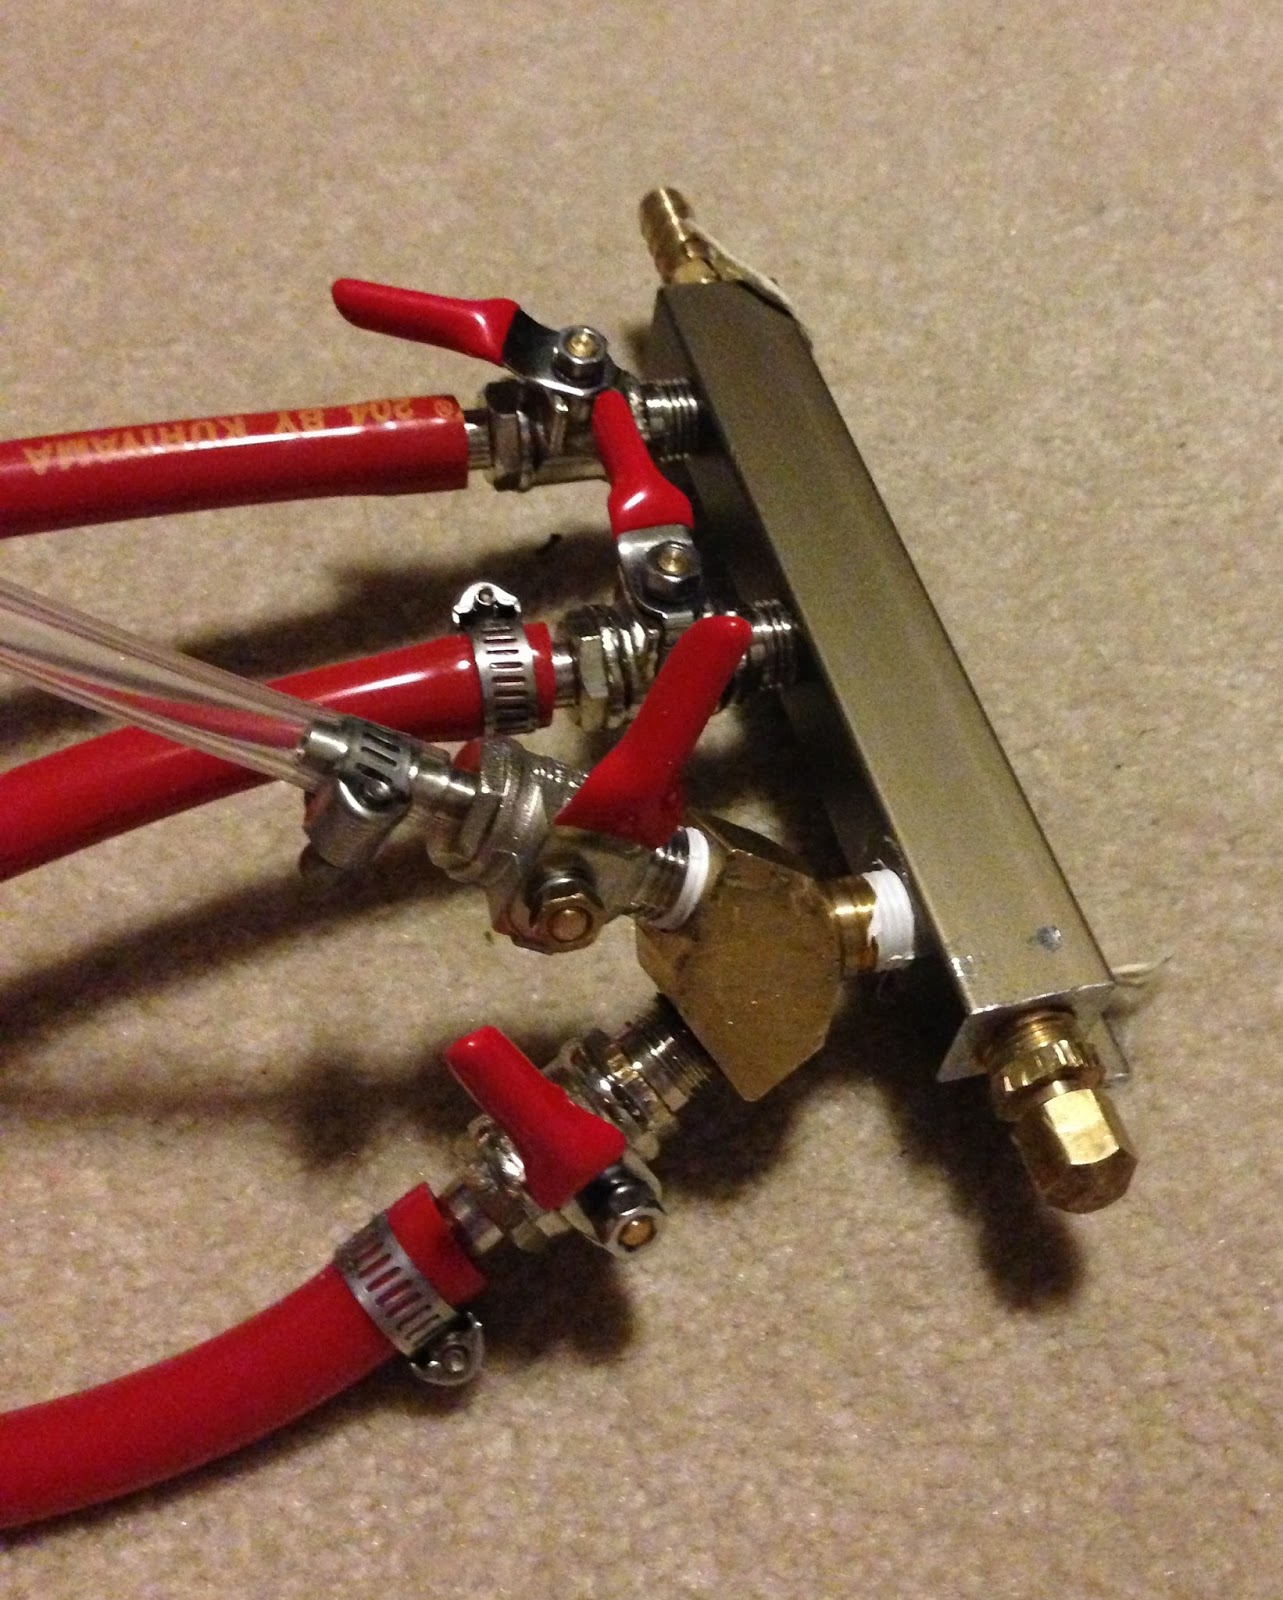
Since we were upgrading in equipment, I also wanted to upgrade in the number of taps.  We had 3 before, so that meant going to 4 or 5. Because we wanted to have that many taps, a fairly large sized chest freezer would be needed, something in the +14 cubic foot range. Elise happened to be looking online at Lowe’s one day and found a 14.8 cubic ft chest freezer that was marked down $150, and since there was only 1 left, we pulled the trigger and bought it!

What will follow is our account of making the chest freezer into our own personal kegerator. In order to make this process easier to read and follow, I’m planning to post in smaller portions instead of one giant, long post.

Reminder: This is not going to be posted to correlate where we are in the project.
It’s already done. It looks awesome. 

Enjoy!

Wednesday, August 28, 2013

Hop Update


The hops are now in their second year of life and I was hopeful we would get a few ounces of hops this year at harvest time. Unfortunately, the plants had other ideas. They both seemed to climb quickly, so I thought things were off to a good start. For the Newport, all 4 bines reached the top, while the Centennial had 1 bine reach the top very quickly and the rest seemed to stall out. I don’t know if they got too much direct afternoon sunlight, or the soil wasn’t good, or not enough water, or something else, but there have been no hops at all. We were both looking forward to at least dropping a cone or two in some beers, but we didn’t even get that. Since there’s nothing to harvest, I’ve all but given up on them and have now stopped watering them for the season. We’ll see what the future has in store for those two, but this year was a lot of wasted time and water. Hops usually don’t produce much in the first year, and tend to start increasing after that. I have heard people say it takes up to 3 years before they really start producing, so we’ll see if they get another shot next year.

#TeamDietrich

Pale Ale


Over the weekend with Elise’s parents in town, I was able to brew another batch of Pale Ale. With football season coming up (and a lot of darker beers on tap), I thought keeping a Pale Ale on tap would be nice. With the last batch turning out so well, I decided to keep most of the recipe the same. We’ll still do pale malt with a mix of C40 and C60, but instead of CaraPils, I subbed Munich Malt. Hopefully the Munich will add a touch more maltiness and body to the beer.

I also changed the hopping up a bit. This time we’ll bitter with Chinook, then 1 oz of Cascade at 20min. At 2 min we’ll add 1 oz of Cascase and 1.5 oz of Chinook (pic above of the 2.5 oz of hops). We’ll dry hop with only 1 oz of Chinook this time. With the last pale ale, we did 2 oz of dry hop and I felt as though 2 ounces should have produced more hop aroma than it did. I don’t know if it is a result of hopping in the keg, or some other reason, but this time I’ll add more hops at the very end of the boil and add less as a dry hop. I hope that the Chinook with add a nice herbal/spiciness to the citrus characters from the Cascade. We’ll see how that turns out. This one should be similar to the last batch and clock in around 5.5-5.6% and be ready in about 3 weeks.

There’s been some developments at Rowdy Reptile in the last week regarding the kegerator, but more on that later.

#TeamDietrich

Friday, August 9, 2013

Tasting: Panda Watch Pale Ale


We brewed this beer in anticipation of Cody's arrival. Our friend Ryan attributed the waiting around to the Panda Watch scene in Anchorman, and we thought that would be a great name for this beer. 

Appearance: deep straw in color, almost amber. Now that's its been legged for a few weeks, it's actually cleared up nicely; maybe a touch of chill haze. There is some lacing from the head thanks to the hops. 

Aroma: early samples were very very citrusy, which had died down some now. Still a good citrus note, but there are some more herbal and grassy aromas in there. 

Taste: a nice amount of bitterness, about what I would want in a pale ale. Not tongue-splitting bitter like an IPA, but nice and slightly more bitter in a bitter:malt ratio. Good hop flavors that last throughout; similar to the aroma. The carbonation is nice and crisp (maybe a touch on the high side if I'm being picky) and makes for a medium-low bodied ale. 

Overall: 
I wish the color was a little bit lighter, but I think most of that is coming from carmelization in the kettle during our boil. Since we have an aluminum pot, it is a little thinner than stainless steel, so the flame is causing some darkening. Most of our lighter beers always seem to have a darker quality to them than they should. Hopefully some day we'll move on up to a stainless steel kettle.

But overall, we are really enjoying this beer. I think to date, this is the best hoppy beer we've made, and I think a lot of that has to do with our brewing salts. We added a lot more sulfates to this one than we ever have before. The high sulfate content is supposed to accentuate hops, and it seems like that is definitely true. It's nice and crisp, and pairs well with just about anything we want. 

#TeamDietrich

Sunday, August 4, 2013

Manifold Upgrade


Now that we have a pipeline going with enough beer and kegs, it was time to upgrade our manifold a bit. When we got the kegerator, we planned on 3 taps, so we bought a manifold with 3 valves to carbonate/dispense each tap (the 3 red gas lines in the picture above). Now that we want to have beer “on deck” and carbonating while not on tap, we need to expand our gas line options.

Ideal world: buy in-line regulators. In-line regulators are regulators in series, that that as you go down the line, you can decrease the PSI and have each tap at a unique carbonation. This would be ideal as we brew a wide variety of beers and English, American, and Belgian beers all have subtle differences in recommended carbonation levels. Unfortunately, these are not cheap, so we’ll wait on that for a while.

Manifold options:
1.       Buy a new, larger manifold: We could upgrade to a 5-port manifold to have everything we would need, but again, this would require another $70, and then what do we do with the old one?
2.       Add a Y-site: This will turn 1 port into 2, and will only cost about $20 with the fitting and the new check valve that we’ll need. They’ll both be at the same pressure, but so is everything else right now, so it wouldn’t be different than what we are doing now.  

If anyone’s read this blog before, you know that here at Rowdy Reptile, we do things on the cheap; so we went with the Y-site. It was a lot harder to assemble than I imagined only because the old valves were next to impossible to unscrew. I tried different things over of the course of a few days without any success. Eventually, I bought a small $4 vise from Lowes and was able to clamp the manifold down to a counter in the garage. Only then was I able to unscrew one of the valves to add the y-site. Once assembled, the only issues is the tight spaces between the valves. As you can see, the y-site is perpendicular to the other valves to allow enough space for the actual tubing. 

Thankfully, it's up and running now, but as you would guess, we aren't using all the lines just yet. Since the Black IPA was ready I swapped that out for the Dubbel. Hoppy beers are best fresh, so I wanted to get that up and running as soon as possible. As I think the Dubbel could use a little more time to age, I took that out of the fridge for now and will let it age until we need it again in the garage.

Next posts will be some more tasting notes, then hopefully we'll squeeze in another brew in a couple-few weeks. 

#TeamDietrich

Tuesday, July 30, 2013

Tasting: Schwarzbier


Appearance: at first glance, it looks black, but when held up to the the light the beer is a deep brown and is actually quite clear. There is an off-white colored head that dissipates into a thin layer but lasts through the rest of the beer 

Aroma: sweet, dark malts; a hint of roast, no hops. The majority is likely coming from the high amount of dark Munich malt is this one

Taste:  very smooth from start to finish. The sweetness from the dark malts is very enjoyable and is well balanced by just a hint of roast. Its not "sugar" sweet, but instead, more of a deep dark-bready flavor. For such a dark beer, the roast is very minimal and if I weren't looking for it, I probably wouldn't notice it. The carbonation is right on and there are enough bubbles to cleanse the palate between bites of food 

Overall: the smoothness if this brew combined with the moderately-low alcohol makes this a great session beer. I think the 3 months of lagering have helped the smoothness, and I wouldn't change anything about this beer. It has been pairing well with everything from cookies to BBQ and is turning out to be a lot more versatile than I originally thought it would be. Elise and I are both really enjoying it (even in the summer) and I should probably make another pretty soon for the late-fall/winter. Maybe next time we'll use a proper lager yeast and compare the difference with the Cali-"lager" (aka steam beer) yeast.

Next post I'll review the Panda Watch Pale Ale

Until then, 

#TeamDietrich

Saturday, July 20, 2013

Black IPA on Deck

Just finished kegging the Black IPA and added the 3 ounces of dry hop: 2 oz Simcoe, 1 oz Centennial.  The re-used yeast did a good job and this one clocks in at 6.9% alcohol. The uncarbonated sample tasted pretty good. Very smooth, a good level of roastiness, but not as bitter as I imagined. We'll see how bitter it is when it is carbonated and cold, but I am looking forward to tasting this one in a couple of weeks.

The make sure we get the most out of the dry hop (and because we finally have a full kegerator) I am not going to start fully carbonating this batch yet. This time I will give the dry hops about 4 days at room temp to infuse into the beer. Hopefully this will allow for more character into the beer early on as compared to the Panda Watch Pale Ale in which the dry hops were added right before it was put into the fridge at 38. The colder it is, the longer the hop oils will take to diffuse throughout the beer. By giving a few days at room temp, hopefully we'll jump start that process and have more aroma when we start drinking it.

No future brews planned yet, but it will have to be something light in color as we have 3 beers of the darker persuasion on right now (Schwarz, Black IPA, and Dubbel). Maybe another pale ale, or we'll try our hand at a Witbier. We'll see.