Saturday, August 23, 2014

Gose


Last night I brewed our first attempt at a Gose. You can see the run down here of the brew day. We used 2 lbs of acidulated malt to "sour" the beer without having to use lactobacillus, but it wasn't easy. The mash didn't go as well as I had thought because my efficiency wasn't great. I had to resort to 6ml of lactic acid to get the mash pH down to an acceptable range because I didn't dilute our water with RO and didn't want do overdo it with the calcium additions. Needless to say, we mashed the wheat and pilsner malt for an hour, then added the acid malt for another hour. I think the idea is to get as much extraction as possible from the wheat and pils prior to adding that large of a quantity of acid malt.

The brew it self went relatively smoothly, but it's still very hot here in Florida. It may be hard to read, but near the bottom in green on the board above, we added 0.75oz ground coriander and 0.5oz sea salt with 10 min left in the boil. I had originally planned for 1oz of coriander and 0.75oz of salt, but ended up trimming it back a bit as I didn't want to overdue it. If we need to, we can always add some additional spices to the keg. It should ferment out in about a week and we'll hopefully be drinking it in 2-3 weeks from now.

Next up will either be a Black IPA, or since I just bought my first pack of lager yeast, we might do a Marzen/Oktoberfest followed by either a dunkel or schwarzbier (maybe the other way around too).

Sunday, August 10, 2014

Full Kegerator


Finally. We have a full kegerator. We kegged the porter earlier this week and it is slowly carbonating now. We usually force carbonate and I can get a beer pretty close to all the way carbonated in about 36 hours. This time though, since all the taps are full, we'll slowly carbonate over 10-14 days. The Not Oberon is the closest beer to being empty, so as soon as that one is out, we'll hook up the porter.

The porter finished at 6%, but the samples tasted a little boozier than that. Hopefully when it's carbonated it will mellow out a bit. The English yeast did a good job though, and the samples were nice and malty. Looking forward to tapping it. We'll brew the Gose in the next couple of weeks hopefully, and since we are at capacity now, maybe we'll do some experimenting with Brett in that batch. We'll see

Saturday, August 2, 2014

Porter Beer


Now that we've got several light beers on tap, I thought we would mix it up and brew something dark. I love porters, and I found an interesting looking recipe in BYO from Icicle brewing in Leavenworth Washington called Priebe Porter.

My gravity was a little lower than expected (likely from not get my mash pH high enough) but we need up with a little over 5 gallons at 1064. I decided to use an English Ale yeast despite the recipe being for an American Porter as I had such good results with the first porter I made using the London Ale III strain. It's a good attenuating, high flocculating strain which should help showcase the malty flavors. It was brewed about 12 days ago and I just started cold crashing it down today. Hopefully we'll keg it in a few days and start carbonating.

This will be the first time we've had a beer "on deck" in the aspect that as soon as one keg kicks, we'll be able to hook up another carbonated keg right away and not have any empty tap. I haven't felt many of the kegs lately, but I bet the Not Oberon or the American Pale will the next one to kick. Hopefully it's soon, or I'll have to attach the picnic tap to try some porter beer.

Next up will be a Gose. Gose is an old German style of beer that is slightly sour and salty. Yes salty. It was originally brewed in the early 16th century in Goslar, Germany, which had a higher than average salt content in their water supply. Its light, refreshing, and the tart acidity will make for a great summer beer. We've had a few examples of the style and I am very excited to try and make one myself.

Sunday, July 13, 2014

4 on Tap


Finally, we have 4 beers on tap. The first 2 (Belgian and Not Oberon) are just so-so, but the APA is tasting really good and the Saison is looking promising so far.

Friday, June 20, 2014

Back For Real


Long time since our last post. I could bore you with the same old reasons of being busy, new job, 2 kids, yada yada yada. We'll stick with whats going on now.

We've brewed twice in the last two weeks! We've joined a homebrew club!

First, about the club. We've joined Special Hoperations, a AHA sanctioned club in Tampa. They are newer (with B.E.E.R.S being the older club in the area) but are climbing the ranks quickly in terms of Florida's homebrewing circuit. We've gone to 1 meeting so far with another planned for this weekend. The clubs meets twice a month to discuss styles, upcoming events, and taste each other's beers. I can't wait to bring some of our beers in to get feedback on ways to improve our brews. We are also looking forward to meeting a great group of people who share a passion for homebrewing as well.Elise and I are really excited to start improving in our beer, our brewing process, and our equipment. There are a few things we have in mind like a new cooler, but are also toying with the idea of getting a second fermentation fridge. We'll see what happens with all of that.

As for the beers, the first brew was a Pale Ale with Columbus and Cascade that will be dry hopped with Citra. Should be about 6% and be ready in a couple of weeks. We've been out of hoppy beer on tap, so this will definitely be a big welcome to our draft lineup.


The second beer (brewed last night) was a Saison modeled after Great Divide's Colette. This was a lower gravity saison, with the OG only at 1050, but since the saison yeast attenuates so well, it will still probably be close to 6%. Can't wait to try this one as it will be the hottest we've ever fermented a beer before. We're starting off at about 72 (beer temp) and will increase to probably 75 by the end. Hopefully we'll get some good spicy notes from the yeast to make a great saison.

We've been brewing at night after the boys have gone to bed for the last 2 brews. It's a little bit easier and allows us some time to actually hang out (as opposed to me getting up at the crack of dawn). Needless to say, the photos are a little darker and we've been getting some good use out of our flashlight.

The next batch will be a porter, which is perfect of course for the insanely hot temperatures of Florida. But, I always like to sip on some dark beers at the end of the night, so I want some porter on tap. We'll have to wait for that one until after the saison is done and the pale ale is finished cold-crashing.


Tuesday, April 8, 2014

Oberon Clone

We're in Florida now, and Spring is here. It's already pretty warm and feeling like Summer. Luckily, Bell's Brewery brews their Summer beer, Oberon Ale, year-round for Florida. It's a light, refreshing, citrusy wheat beer that we both love to drink outside. I found a clone recipe online and decided to give it a shot.

It was a smooth brew day that started pretty early. I was able to get the grains crushed and my water measured out the night before, so the brew day was very smooth. I actually bought extra ice to assist in the cooling process and with the extra cold water in my immersion chiller, I probably shaved 10-15 minutes off of my day and cooled my beer down to 60 quite easily.

This one will probably end up around 6% and we'll dry hop it with Saaz for some herbal/spicy notes, and then a good amount of Cascade to help provide the citrus aromas. It should be ready in a couple of weeks.

In other news, we're drinking the pale ales and they are both tasting pretty good. Most people so far are preferring the American version (myself included), but I think the Belgian just needs a little more time to mellow out. I am hoping to post some tasting notes, and I'm off this weekend, so we'll see.

Tuesday, April 1, 2014

New Digs


Finally got around to making our first batch of beer in Tampa. It's been a busy month since we got here, and we are officially out of beer on tap. Seeing as though the kegerator was empty I came up with the idea to brew 10 gallons and use the kegerator as another fermentation fridge. I wanted to do a Pale Ale and Elise came up with the idea to split the batch and use 2 different yeasts. We haven't done a Belgian Pale Ale in forever, so we did 5 gallons with Belgian yeast and 5 gallons with American.

It was a relatively smooth brew day, some of the equipment was still in boxes, but other than that my table worked great and there weren't any hiccups in the garage. The ground water is a lot warmer in Tampa, so I will need to start getting more ice for the chilling phase, but that shouldn't be too big of an issue.

I will dry the American Pale with 2 oz of Citra hop which will be a new one for us. I am going to dry hop in primary, as opposed to the keg, as I think some of the off flavors were actually coming from the bags I was using to hold the hops in the kegs. We'll see. I'll be kegging on Thursday and hopefully we'll be able to drink some early samples on Saturday in time for the Final Four.

Recipe
18 lbs 2-row
1.7 lb CaraPils
1.3 lb C40
0.2 lb C60

1 oz CTZ at 60
2 oz Cascade at 20
1 oz Cascade at 10
2 oz Citra + 1 oz Cascade at 5 min

Dry Hop (American) 2 oz Citra


Friday, January 24, 2014

2013 Year in Review

2013 was definitely a down year at Rowdy Reptile. Life was exceedingly busy during my residency, add 2 kids on top of that, and there's very little time to drink beer, let alone brew it. As a result, we brewed less than half the volume we've done in the previous 3 years. A total of 9 beers were made in 2013, most being very standard beers: 3 Pale Ales, 3 IPAs, and 3 dark beers; no experimental brews, no seasonal brews, and no Barleywine. Including ingredients and supplies (minus the chest freezer upgrade), our cost per bottle this year was $1.12 or $6.72/6-pack; not bad when you compare that to the $9-11/6-packs you see in the store.


As for the quality of the beers, there were definitely some highs and lows. Our Schwarzbier came out fantastic. It was dark, malty, and very very smooth, and probably my favorite beer of the year. Cody's Panda Watch Pale Ale was another very good beer that we've re-brewed as the first beer of 2014. Unfortunately, not everything was great, and for the first time in 3 years we had to dump a batch of beer for taste reasons. The aluminum monster (aka our boil kettle) built up a scorch/grime over time and since I was under the impression to not scrub aluminum for fear of scratching and ruining the surface, the build up grew enough to eventually impart off flavors into our beer. Darker brews could hide the flavors, but a simple beer, like the SMaSH, was overpowered with an unbearable bitterness rendering it undrinkable.


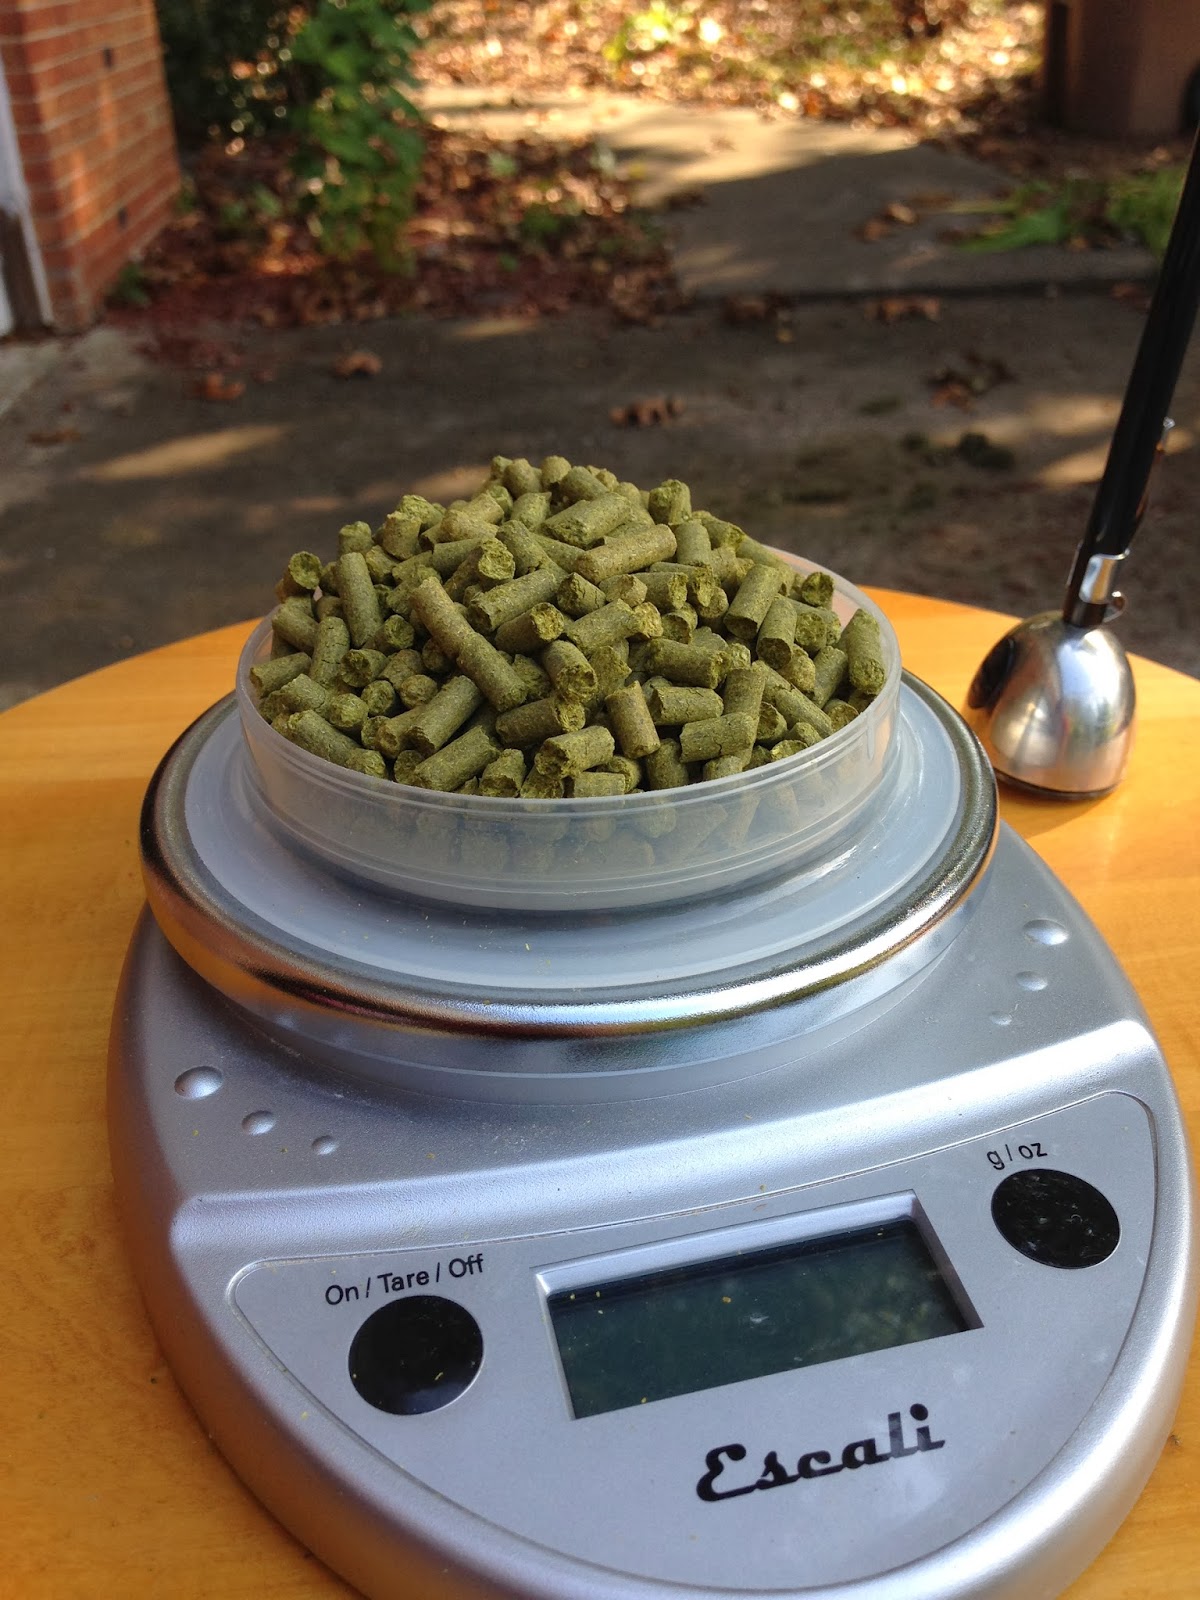
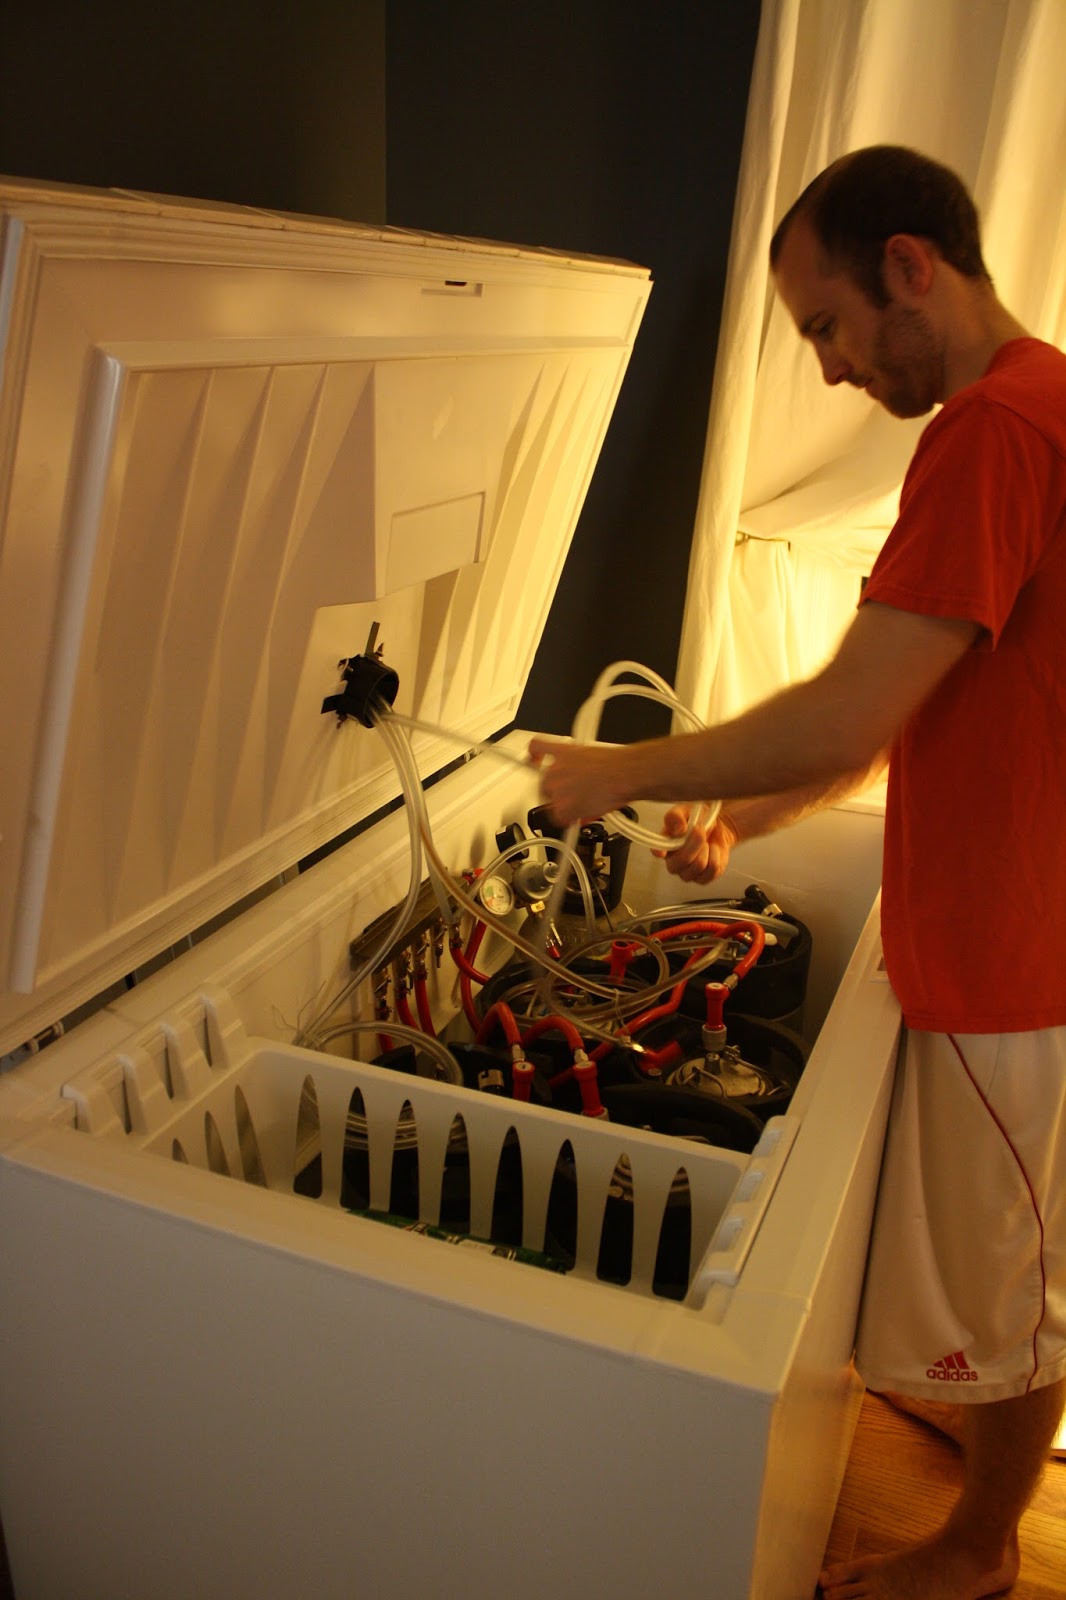
It seems like every year we also make major equipment upgrades, and this year was no different. Our first year we ugraded to all grain, the 2nd year saw the original kegerator, which we've now ugraded again in year 3. In the Summer we sold our old kegerator and upgraded to an indoor chest freezer, added a 4-tap tower, and tiled the lid to complete the look. More importantly (probably), we got rid of the aluminum monster and are now using a keg as our boil kettle. The stainless steel allows me to scrub as much as I want, and the large capacity (15.5 gallons) will allow me to have the option for 10-gallons batches if needed. It was a very easy switch because the keg was free, and I used the money from the kettle sale to go towards the conversion (i.e., making a hole in the top and drilling/welding fittings near the bottom), so it cost $0 to make a very needed upgrade. Compare that with at least $300 for a 10-gallon stainless steel brewpot, and you can see why I jumped at the opportunity as fast as I did. Also, we finally started buying hops in bulk. The savings are incredible (up to $1/oz less than from the homebrew store) and definitely make brewing hoppy beers easier as I am not afraid to add a lot of hops. Already having a Food Saver helped too, because all we needed to buy were some mason jars and a lid attachment and we were set to go.


Looking ahead in 2014, I have a few goals in mind:


1. Brew more

2. Keep all 4 taps full of beer as much as possible

3. Improve in IPAs (we're finally making some progress)

4. Experiment more (another Brett beer at least)

5. Join a homebrew club


Thanks to anyone who is reading this. Looking forward to another interesting year at Rowdy with hopefully more up's than down's in 2014.


#TeamDietrich


Tuesday, January 21, 2014

Panda Watch Pale Ale #2


I hadn't planned on brewing again until after the move (more on that later), but now that we are planning Cody's batptism, it only seems fitting that the beer brewed in honor of his birth be around for the after party. Luckily, I had bought the ingredients at the same time as the Black IPA and I already have my bulk hops, so all I had to do was crush the grain, weigh the hops, and prepare the water the night before.


I brewed this batch at night and with the cool whether (~45) it was a nice night to do it. The brew went relatively smoothly, although I'm still trying to dial in my boil off rate with the new keggle. Instead of finishing with 5 gallons, I finished with just over 4. I dont have a way to measure my pre-boil volume right now, so I'm kind of shooting in the dark with regards to boil off rates. Especially with last night, the fact that I dont know for sure what volume I started with, it's hard to figure out how much I boiled off over the hour. I'm fairly certain I had my anticipated pre-boil volume of a little over 6 gallons, which means I boiled off 2-gallons in the 60 min boil. I either need to start with a higher pre-boil volume next time, or reduce the heat on the burner so the boil isn't as intense and I dont boil off as much.


As a result of the lower volume, my gravity is higher (1064 instead of 1054), so I am toying with the idea of adding an additional gallon of water back to the beer. This will get me to about 1054 which is closer to the Pale Ale I had in mind (as opposed to an almost IPA-strength brew), but diluting may take away from the overall flavor of the beer. I'll think it over today, but I bet I will dilute it. Not only so the gravity is a little closer to goal, but more importanly to increase the number of beers since this is for a party.


We really enjoyed this beer over the summer, and I think the Centennial and Ahtanum work really well together. Hopefully, since we were able to brew it this week, it will be at it's peak around the the time of the party (first weekend in May). I really hope there aren't any off flavors in this beer, but this one (more than the Black IPA) will show me if the aluminum monster (my old pot) was the source of the off flavors, or if it's something I'm doing. We'll see


#TeamDietrich


Recipe:

9 lbs Pale 2-row

10.6 oz Crystal 40L

10.6 oz CaraPils

1.6 oz Crystal 60L


0.5 oz Chinook at 60 min

1 oz Centennial at 15 min

1 oz Ahtanum at 0 min

0.5 oz Ahtanum at 0 min

2 oz Ahtanum (Dry Hop, in keg)


Mash at 153 for 60 min

US-05 at 64 x10 days


Friday, January 17, 2014

Time to get Rowdy in Tampa

Well, so long North Carolina. We're moving (again) and Rowdy is to be located in Tampa, Florida. I was recently hired at St Joe's hospital as the new ER Clinical Specialist and we'll be out of NC within the next couple of weeks. 


Aside from having to physically move, one of the things that we'll have to keep in mind when brewing in the new location is the water. I have been treating my water for a couple of years with basic salts (Gypsum, Calcium Chloride, Chalk, etc) to reach certain targets depending on the type of beer brewed. I'll have to do some research to see if anyone has posted the water reports for Tampa, but I am thinking that since this is likely the last move in a long time, I may send out a sample to Ward Labs to get an exact report. It's not too expensive at $14 and will provide the exact information I need. 


Otherwise, it should be an easy transition and I hope to brew the first batch within 2 weeks of getting there because we only have 1 beer on tap, with a 2nd on the way. The English Porter tapped out yesterday, and the IPA has been gone for a couple of weeks now. The Black IPA is goin strong and we'll keg the Panda Watch in about 1 week. 


Additionally, now that we have family around, I'm going to probably have to brew a lot more than I did in the last year to keep the kegerator full. Hopefully we'll get back to ~100 gallon/year, if not more, which will allow for more experimentation rather than brewing out of necessity. It's seemed like a rarity since we upgraded to 4 taps to have all 4 tap flowing, but that will be the goal for 2014. It's going to take at least 4-5 months to have enough beer brewed to have a good supply, but we'll start brewing soon and won't look back. I cant wait to finally have a good variety of beers on tap, as well as being able to brew our Seasonals and yearly Barleywine, and to finally make another Brett beer again.


Lastly, I really am looking forward to finally joining a home brew club. This move is going to be for the long-run, so I am determined to finally join a club. The last year hasnt been a banner year for Rowdy, some of the blame is on the aluminum monster, but I know I can improve my technique and process by learning from other brewers and tasting other people's beers. I'm sure that joining a club will not only make me a better brewer, but I know I am going to meet some great people regardless.


#TeamDietrich


Centennial SMaSH

Well, the aluminum monster had 1 last casualty, and it was this beer. The aroma is very nice, lots of citrus, floral, "American" hop all the way. The taste on the other hand is waaaay off. There is a very intensely bitter off flavor which I think is from all that scum/scorch in the aluminum pot. Since there is literally nothing in the beer to hide behind, that flavor is very distinct and makes the beer undrinkable.


Subsequently, I used it to water the street the other day. First batch that I've screwed up enough to pour out. Luckily, the aluminum monster is no longer employed at Rowdy Reptile (it was cleaned thoroughly prior to selling and is spotless btw) and now we have the keggle. I've brewed one beer with the keggle so far, a Black IPA, and while that is not an ideal beer to compare to the SMASH in terms of potential flaws/off flavors (there's a lot going on to hide behind between the hops and dark malts), the first sample was good and I couldnt detect any of those bitter/astringent off flavors that we had in the SMASH.


#TeamDietrich


Sunday, December 22, 2013

Locked Out Black IPA


With only 2 beers on tap (porter and IPA), we are definitely needing to get brewing to fill that kegerator
 up. Today I brewed our Black IPA (now for the 3rd time). We used the same grain bill as previous versions, but scaled it up for 6 gallons in order to end up with 5 gallons in the keg. Also, now that we have bulk hops, I upped both the late addition and dry hop amounts so hopefully, it will be on par with the commercial example in the hop-department as the malt flavor is spot on (Stone Sublimely Self Righteous).


The day could not gotten off to a worse start though. I went to the garage at about 715a to start the mash and immediately locked myself out of the house. Fantastic start to the day. After that was taken care of, the rest of the day went smoothly. I was able to clean a couple of dirty kegs while I brewed and the weather was nice and cool, although a little windy. I finished in about 3.5 hours, which is one of the fastest days yet.


This batch was also our first brew using the new keggle. Hopefully we wont have similar issues with this brew pot as the aluminum because the stainless steel is so much easier to keep clean. I was happy with it today and it seemed to come to a boil a little quicker than the other pot did. We'll have to keep tweaking our volumes initially though until we get the boil off rate figured out. I'm going to do some reseach about making a dip-tube to draw the wort from the side of the keggle when transferring to hopefully leave a lot of hops and trub behind.


Recipe:

90% Pale 2-row

5% Crystal 60L

5% Carafa III


2 oz Chinook at 60

2.25 oz Centennial at 2 min

2.25 oz Simcoe at 2 min


2.25 oz Centennial -- Dry hop

2.25 oz Simcoe -- Dry hop


Yeast: US05


OG: 1074

Efficiency: 72%

Anticipated alchol: +7%

Friday, December 13, 2013

Happenings and Updates


It has been a couple of weeks since I last posted, thought I would give an update on the brewery


Centennial SMaSH: still carbonating, flavor so far is pretty bitter (like too bitter and I'm worried I may have done something wrong) but hopefully it will mellow some (like the IPA did); it's actually clearing up pretty well from a clarity standpoint too. Hopefully can do a formal tasting post in another week or so.


IPA: Hoping to evaluate this weekend. Stay tuned (spoiler: not groundbreaking, but in the right direction)


CraigsList: Rowdy Reptile is always looking to upgrade and since I recently came into possession of a standard half-barrel keg, it's time to make a keggle (i.e., boil kettle from a keg shell). I found a guy on CL who will cut a hole in the lid and weld a fitting in the side to allow me to drain the wort through a valve. Traditionally, most people will drill a hole and use weld-less fittings which is fine. Having them welded though, ensures no leaks, so I'm very happy to have this option. He's only charging $50 which is an awesome deal, so I'm very excited about that. The keg is being dropped off this weekend and should be ready to go for our next brew (a black IPA) right before Christmas.


I'm also selling the old boil kettle (to bank role the upgrade). The alumimum monster is finally going to find another home and will hopefully bring them better brews. After cleaning the kettle with a vinegar/water mixture, I scrubbed off a lot of grime from the bottom of the kettle. I am thinking this may be the culprit of a lot of the off flavors we've been having lately. Mostly from the standpoint that I have never cleaned the kettle that thoroughly in the past and the grime/scorch has slowly built up over time. Now that it's significant enough, we are probably starting to detect the flavors imparted into our beers.....probably should have cleaned it better, but I had read not to use anything abrasive on aluminum, so I only used a sponge. Oh well, at least now we're finally done with that. I am really hoping these off flavors will dissapear with the new kettle as well as the color issues and we can finally start making excellent pale beers.


Until next time


#TeamDietrich


Saturday, November 23, 2013

Centennial SMaSH Pale Ale


After buying 16 oz of centennial hops, I thought what better way to get acquainted with the nuances of the flavors and aromas than to brew a SMaSH: Single Malt and Single Hop. By only using 1 hop and 1 malt, you can learn a lot of the flavor profiles of each and surprisingly, most people report a good amount of complexity in the finished product.

I chose to use centennial as we both like that hop (it's featured prominently in many commercial beers like Bell's Two Hearted Ale and Great Divide's Hercules DIPA) and we have plenty to experiment with. For the malt I chose to go with Marris Otter (MO). MO is an English pale malt that is kilned to a slightly darker color than standard American 2-row. The darker color gives it a little more biscuity/toasty flavor than US 2-row and therefore will bring a little more to the table. I was shooting for a ~5.5% beer of the pale-ale persuasion seeing that I brewed a 7.2% beer previously. 

It was a relatively smooth brew day, but this was the first time I've brewed at night. Normally, I get up at the crack of dawn and get  75-80% of the brewing done before anyone in the house wakes up. This time, I waited until just about bed time to mash in, and when the kids were down, was able to start the boil. I did a 60 min mash and a 60 min boil with a 10 min hop stand. 

I'm hoping this one will be a lot better than the last pale ale I made, which is on the verge of being dumped because it's just not tasting right and no one wants to drink it.  I am also starting to think that some of my issues making pale beers are not only from the carmelization from my aluminum kettle, but maybe because I am not using high temperature-rated tubing when I am draining my mash (with +160 degree wort). So maybe, some off flavors are being generated there that are otherwise covered up in darker beers. 

I am going to try and sell my old empty bottles (gotta love Craig's List) and put that money towards the conversion of a 15.5 gal stainless steel keg into a brew kettle. Hopefully, that switch and using different tubing will solve the off flavors I'm getting in these beers. Otherwise, I'm going to have to turn to using different water (like Distilled water) and building back my salts/ions from there with the addition of some acid to make sure my pH is in range. We'll see. 


Recipe (6 gallons):
12 lbs Marris Otter

Mash at 151 for 60 min

Hops:
1 oz Centennial at 60 min
0.66 oz Centennial at 20 min
1.5 oz Centennial at 0 min
2 oz Centennial (Dry Hop) 
Yeast: WY1272

OG: 1062
FG: 1012
Alcohol: 6.6%

Brewed: 11/17
Cold Crashed: 11/27
Kegged: 11/31

#TeamDietrich


Firestone Walker Union Jack Clone

In our first attempt at brewing a "real" IPA and not skimping on any hops, we decided to do a clone of an excellent IPA we both love. Firestone Walker is known for making suberb beers, and Union Jack is no exception. I found this recipe on a homebrewer's blog (BertusBrewing.com) and decided to give it a shot. Union Jack won gold at the GABG in 2008 and 2009, so I figured if we're anywhere in the ball park, this will be an excellent beer.

Recipe  (6 gallons):
12.5 lbs Pale 2-row
2 lbs Munich
10 oz Carapils
3.5 oz Carastan

Mash at 147 for 60 min

Hops:
1 oz Apollo at 75 min
0.5 oz each Cascade/Centennial/Chinook at 30 min
2 oz each Cascade/Centennial at 0 min

Dry Hop #1: 1.5oz each Cascade/Centennial + 0.5 oz Simcoe (3.5 oz total)
Dry Hop #2: 1 oz each Cascade/Centennial + 0.5 oz each Simcoe/Chinook (3 oz total)

Yeast: WY1272

Brewed: 10/22/13
Dry Hop #1: 10/31
Dry Hop #2: 11/5
Kegged: 11/9

OG: 1064
FG: 1009
Alcohol: 7.2%

                           Photo: 13 oz of hops!                                                Photo: 4 oz of hops at 0 min 


The brewday was a relatively smooth with only a couple of hiccups. I was supposed to boil for 90 min, but forgot that when I was doing the water calculations and only planned for a 60 min boil. I split the difference and did a 75 min boil and ended up with a little less beer, but the IBUs were still about the same. My efficiency was a little lower than expected (70% instead of the normal 75%) so I came in about 6 points under on the gravity. I also did a 10 min whirlpool/hop stand and let the 0 min hops sit for 10 min prior to the start of chilling. A lot of the pro breweries like Stone and Firestone Walker use these rests before chilling to get the most out of their flameout hops, so I am going to start doing this regularly as well. 

This brew also employs a 2 part dry hop which I've never done before. Since there are so many hops, I needed to be extra careful to avoid oxidizing the beer and ruining the hop flavors I worked so hard to get in there. I did the first dry hop in the primary and the transferred to a secondary vessel for the second addition. I did not want to do both additions in the same vessel to avoid the volume of hops in one container. Making this one a 6 gallon batch was also very help as I lost a lot of volume due to hop and yeast sludge in the primary fermenter. The extra volume also allowed me to fill up the secondary vessel all the way to the top to have as little surface area as possible exposed to oxygen. 

This is the first batch I've also used gelatin (or any finning agents for that matter) to clear the beer. I added the gelatin about 36 hours prior to kegging to precipitate as much out of the beer as possible. I am hoping that the beer will be a lot clearer earlier with the help of the gelatin as opposed to clearing up after a few weeks in the keg. 

I'll do a tasting post of this one in a couple of weeks when it's had time to carbonate and stabilize in the keg. Hopefully it will be worth the $55 I spent on ingredients! 


#TeamDietrich 

Sunday, November 10, 2013

Bulk Hops


I finally, finally, got around to buying a food saver mason jar attachment. With the attachment, I am now able to vacuum seal mason jars and store bulk hops.

After we made the Union Jack clone and saw how many hops are actually needed to make good beer, I knew I had to buy in bulk. Otherwise, I would spend a fortune in just hops alone. There are several places online to buy bulk hops from, but I chose to get this round from YakimaValleyHops.com. We don't make too many English or German beers, so I stuck with common American varieties. It was a little hard to choose which hops to get, but I decided on 8 varieties to start with. Most were at least 8 oz, with 2 of the varieties being 4 oz and 2 oz. Most were about $1.25/oz which is about half (if not more) of the cost of buying single ounces of hops at the homebrew stores. Since I want to really start focusing on pale ales and IPAs, I'll be able to use double the hops for roughly the same price as before.

In total, we now have:

16 oz Centennial
8 oz Cascade
8 oz Simcoe
8 oz Citra
8 oz Chinook
8 oz Columbus
4 oz Ahtanum
2 oz Apollo

The first planned brew with the new hops will be a Centennial SMaSH Pale Ale using Marris Otter. SMaSH stands for Single Hop and Single Malt meaning only using 1 hop for the entire beer and only using 1 malt. It's a good way to learn the flavors and aromas from not only the hop, but the malt choice as well. I'm really looking forward to the next few batches and hopefully I'll finally be able to turn out a solid IPA.

#Team Dietrich

Friday, November 8, 2013

Porter Review


When the weather starts getting cooler, I always crave a nice porter. Dark and malty, they pair nicely with a wide array of dishes and as well as great after dinner beers to enjoy slowly. Last year's batch was well received, so rather than reinvent the wheel, I decided to brew it again.

Recipe
7.5 lbs Marris Otter
1.63 lbs Brown Malt
0.5 lbs Black Malt

1 oz Willamette at 60 min
0.5 oz Fuggles at 30 min

Yeast: WY1968 London ESB

OG: 1053
FG: 1019
Alcohol= 4.3%

Brewed 9/9/13
Kegged 10/9/19

As I mentioned in the post about the brew day, I was concerned with this particular yeast's penchant for  stalling out early. I tried rousing the yeast by swirling the carboy and I raised the fermentation temperature towards the end, but the yeast still under attenuated. With the different yeast last year, the beer started at about the same OG (1052) but finished way lower at 1005.  As a result, this is the lowest  alcohol beer we've ever made. I'm not mad about making a 4.3% beer as I've been gravitating towards more drinkable, lower alcohol beers lately, but I would rather plan on making a 4% beer than making one on accident.

Appearance: pours very dark, a thin cream-colored head that seems to be improving the more the keg ages

Aroma: dark malt, some chocolate and a little bit of roast

Taste: sweet, but not under attenuated sweet (which is good considering it finished at 1019); similar to the aroma with a slight touch of chocolate but a lithe more roastiness. Certainly not a dry finish, but again, not as thick as the final gravity would suggest

Overall: this one is decent; not as good as last year's version, but still a easy to drink, sessionable beer. It's hard to give it a good comparison to last year's version considering the final gravities are so different, but as a result, I wont be using this yeast again in the near future. I know a lot of people have good success with that strain, but I haven't had it myself yet. I will definitely make an English Porter again and use WY1318, but I am also wanting to do an American Porter after having a few good examples last month (Sierra Nevada and Cigar City).


Wednesday, October 23, 2013

Pale Ale Review


Recipe:
9 lbs Pale 2-row
10.6 oz Crystal 40L
10.6 oz Munich
1.6 oz Crystal 60L

0.5 oz Chinook at 60 min
1 oz Cascade at 20 min
1.5 oz Chinook + 1 oz Cascade at 2 min

Dry Hop: 1 oz Chinook

Yeast: WY1272 American Ale II
OG: 1054
FG: 1011
Alochol= 5.6%

This was an attempt to make a little more malty pale ale the Panda Watch Pale Ale. I thought by substituting Munich malt for Carapils, it would lend more malt flavor to the beer without changing the body very much. The result wasn't very good. Compared to the last pale ale (Panda Watch), this one just seems a lot more "blah." It doesnt have the crispness of the previous version, it's not as "bright," and overall it's a little underwhelming.

Appearance: As you can see in the picture, it's still really hazy and kind of a dull copper color. I am starting to think that my aluminum kettle is too thin and is resulting in some caramelization/color change during the boil. It has a reasonable head on the pour that dissipates into a thin layer.

Aroma: The aroma is probably a little more malty this time around. The Chinook hops are providing more of a dark, resinous aroma (as opposed to floral/citrus from other hops) that I like, but there isn't enough of it.

Taste: Again, a little underwhelming, but some malt sweetness upfront and a touch of bitterness. The finish is pretty smooth, which makes it easy to drink.

Overall: not something I would brew again. I think a lot of my problems with hoppy beers are that I don't add enough hops. Seems simple to add a lot of hops to hoppy beers, but before I had a job we couldn't spend $40-50 on a beer. Hops are expensive when you only buy 1 oz at a time, so we used less than we probably should. There's a total of 5 oz in the beer, and it probably should be closer to 8, with all of the additional hops at the end of the boil/dry hop. The malt bill isn't great either. If I were to use Munich again, it should probably be closer to 2 lbs (not around a half a pound).

Overall, it's back to the drawing board for our pale ale. The Panda Watch was good, but I think it could be better. I'm going to start buying hops in bulk this year and I think that will really make a difference. At $1/oz it will satisfy my need to make inexpensive beers, but I can use twice the hops and still spend less overall than previously. I found a great blog (Bertusbrewing.com) by a homebrewer who brews mainly IPAs. I'm going to try a couple of his recipes (and use the same amount of hops) and see where we stand after that. I'm also going to use some of the recipes in the IPA book Elise got me and hopefully, in the next few months we'll have some proper IPAs and Pale Ales on tap.

#TeamDietrich

Monday, October 21, 2013

Kegerator Part 5: Let There Be Beer

After everything was dry, it was time to finally attach the gas and beer lines. The kegs had been sitting in the kegerator the entire time, so they were cold (and aside from the pale ale which had a leak) were all carbonated. Therefore, as soon as I could hook them up, we would be able to drink from them.

The gas (22 feet) and beverage line (40 ft) that I bought each came as 1 continuous length of tubing. I had taken some measurements from where I thought our 5-port manifold would be mounted and came up with about 1.5’ of tubing for 3 of the gas lines and 2’ for the other 2 gas lines; the extra length would be used to attach the manifold to the CO2 tank. Each beer line would be 8’ in length, with 4 taps, I only technically needed 32 feet of tubing. I wanted an extra beer line in case we ever brought a keg somewhere and needed to set up a picnic tap, I would have enough line to serve it properly. Each tubing was cut and then attached to the correct connector (gas vs beverage) and fitted with a hose clamp to ensure a good seal. I mistakenly bought 1/4” gas-line attachments for the manifold instead of 5/16” attachments. You would think that the 1/16” difference wouldn’t matter that much, but surprisingly it did. Thankfully, with the hose clamps tightly secured, there weren’t any gas leaks coming from the manifold.

Instead of trying to drill into the side of the freezer (and risk damaging something vital behind the wall) I decided to glue 6 magnets to the back of the manifold and mount it to the sides of the chest freezer. I glued a few days in advance and the glue was cured nicely in time to start assembling. Here it is on the outside of the chest freezer to make it a little easier to visualize.


After setting up the gas lines, it was finally time to connect our beer lines. The tubes were simply run up to the tower and attached to the back of the faucets with hose clamps. There is plenty of room in the tower, so the connections with the faucets don’t need to be angled at 90 degrees which made them easy to attach. We wrote with a silver sharpie on the actual connections down below to make it easy to identify which tap line was which for ease when swapping kegs out.


Next was time to mount the faucets. We bought standard chrome-plated faucets (brass underneath) as they are much less expensive than full-on stainless steel faucets (about $25/ea vs $50/ea). They get the job done, but aren’t as nice and tend to drip more than stainless steel Perlick faucets. Over time though, we’ll slowly convert each one to a SS faucet, and maybe even a stout faucet for when we serve stout as the faucets are easy to change out.


After all the lines were set up, we needed to flush the tubing with sanitizer prior to serving any beer through them. I filled a keg with StarSan (a no-rinse sanitizer) and then attached it to the CO2 tank. Each tap was then opened to allow sanitizer to run though the lines and faucet for about 30 seconds. After all the lines were clean, we hooked up the beer and were ready to drink, finally.


Saturday, October 5, 2013

Kegerator Part 4: Tiling

Picking out tile wasn’t an easy task. There are so many options and a very wide range in prices. We didn’t have a ton of money to spend on the project, so it was a process trying to find a quality tile that we liked and wouldn’t break the bank. We eventually settled on a glass and stone mosaic combination we found at Lowes. For $5.98/sq foot, it was a pretty good price as our 2nd choice was about double that.


We needed to get 11 tiles to fill the top and had to do some cutting to fill in the top row and the last rows on the edge. Since the tile is manufactured to “interlock”  there isn’t a flat edge on the sides and we had to get a tile saw in order to square off both ends. We first looked at renting one, but estimated that it would be about $75-100 depending on how long we wanted to use the saw (4hrs vs 24 hrs). So we turned to Craig’s List again and found a saw for $55. Other supplies that we ended up having to buy included 2 trowels (to spread the mortar), grout float, grout sponge, drill-bit mixing attachment, and spacers.

The day we decided to lay the tile I was working an evening shift (230-11p) so I cut the tile in the morning. Using the tile saw was pretty easy and the blade was still in good condition. It cut through both the glass and stone easily as long as you went slow and there was plenty of water in the blade-well. We had laid the tile out the night before and numbered each tile to match where it would lay on the lid. The planning beforehand really made the cutting easy and I was done in about 15 minutes.


When I got home from work (around 1130p) and with both kids asleep, we mixed our mortar and set off. I was responsible for spreading the mortar and Elise laid the tile behind me. Neither one of us had any previous experience with tiling before, but we each had a read a couple of articles and watched some videos on YouTube, so we had a little bit of an idea of what we were supposed to be doing. It turned out to be a pretty smooth process, except for around the tower. A round tower with rectangular tile made for a little bit of difficulty, but with the extra tile pieces we had left I cut some angles and we made it work as best we could.


We had to let the mortar sit for 24 hours before we could grout, but since there was both stone and glass on our mosaic, it was recommended to us to seal the stone prior to grouting to avoid the grout soaking into the stone. On Day 2 it took about 5 min to brush sealant on the stone tiles and another 24 hours of waiting until we were ready to grout.

On Day 3 we mixed the grout and Elise worked it into the tiles. The tape around the tower was taped only on the top so the grout would be flush against the sides of the tower to hide the plywood beneath.  After the grout sat for a bit, it was time to use the sponge and wipe off the excess. Luckily the sponge had a textured side which made the scrubbing easier than expected to remove the stubborn grout from the tiles, but overall it wasn’t too painful of a process for Elise to do.


After the mortar dried for 24 hours, we had to apply another coat of sealant, this time to protect our newly finished grout. I didn’t have much of a clue as to what I was doing, so I just soaked the sponge with sealant and spread it around the tile. I applied 2 coats to make sure I got enough on there and then waited for about 30 minutes prior to wiping the excess off. After that, it was another 24 hours to completely dry and then we could set up the beer lines and finally start drinking.